A simple project that looks simultaneously rustic & refined upon completion, this DIY Farmhouse Round Table is the perfect way to open up your dining space!

When we bought our house about a year and half ago, Chels and I had very different visions for the informal dining space between the kitchen and the living room. I saw a practical, useful hangout space with a bar height table and lots of chairs - a place for the kids to do schoolwork, she and I to write, for the family to play games or watch a movie and eat pizza on a Friday night. The funny thing is...Chels saw the same thing, but with a very different table. She wanted something smaller and lighter, that wouldn't crowd the space, something round to encourage interaction and conversation. She wanted this DIY farmhouse round table.
I won, sadly.
As usually happens when Chels is right and I'm wrong, time proved her point. The massive bar height table I purchased for the space lived in our informal dining space for about a year, and as we scooted around the edges of it to get by, and I began to realize how small it made a fairly large space feel, and how far apart we all were when we were sitting at it! We already had a large formal dining table that I built last year - there was no need for two gigantic flat spaces one room apart! So...the bar height table went on Craigslist, and we began many trips to Lowe's, Home Depot, Goodwill, and our local secondhand furniture store. Why the last two? Well...I'm not quite ready to tackle building chairs yet, so I'll share with you how we acquired and refinished four chairs and four bar stools as part of this little makeover for our informal dining space.

That's when we saw Shanty2Chic's DIY Round Table. If you read the previous post on the farmhouse-style formal dining table I mentioned a second ago, you know that we got the plans for that from Shanty as well. Those ladies know their stuff, and their plans are incredible. As someone who grew up building every Lego set I could get my hands on, having instructions to follow is a great way to build confidence and get experience when you don't have any of either! We're so happy with the way this round table turned out, and it would have been immensely more challenging (not to mention much less attractive) without those plans!
The Shanty girls talk about this a lot, and I sang its praises in the last table post, but you absolutely must own a Kreg Jig to make this project work. The ladies at Shanty use the beastly and excellent Kreg Jig K5, and while I would love to own one of those someday, I purchased the humble and inexpensive R3 last year, and it has served me very well. It's a little more work than the K5, but I love this little guy.

I found that using two drills at the same time made the process go a little faster - one for drilling the pocket holes, and one screwing in the pocket hole screws. That way, I wasn't constantly changing bits, which was nice. If you don't have two drills, of course, that's okay, too!

Using Kreg clamps with the jig makes the whole process a bit simpler and a lot faster, as the face of the clamp fits perfectly into the opening on the jig. Plus, the clamps are strong, precise, easy to use, and easy on the hands with their rubber covered grips.

I did buy an extra clamp for this project that I didn't have for the last one, and that's a six-inch Automaxx face clamp. There are two ways in which this larger clamp is a lifesaver! One, it's longer reach allows you to clamp the 1x6 lumber you use for the top of this table from the opposite side as you go, which gives you a much nicer, more even surface even before sanding. Two, the Automaxx feature (which I didn't even know existed!) automatically adjusts itself to the width of the items you're clamping - no more fooling with the little screw on the back of the clamp to get the grip right! I'm not being paid to shill for Kreg here, folks, but this feature is an insane timesaver. Worth every penny, and then some.

The top of the table is put together from the bottom, of course, as you don't want all of those pocket holes on top! And, as you can see, it's not round to begin with! It's quite jagged, actually...
When you're choosing the side of the wood that you want facing up, remember, this is the side you're going to be looking at, eating on, etc. Choose pieces with character. If you're like us, you want the knots facing up! Which means, when you're putting in the pocket holes...they should be facing down!

So, what's the first question everyone always asks about this table? "How did you get it so round?" It's kind of funny when you think about it, as the method is incredibly simple, but I don't know that I could have ever come up with it on my own. I don't know if Shanty came up with this idea on their own or not, but it's brilliant.

Notice how I've lost my carpenter pencils again in the photo above...constantly! Anyway...

A small nail is placed in the center of the bottom of the table, and a string is tied around it. For this project, at precisely 24 inches, the pencil is tied on, and you simply move the pencil around the table at the extreme edge of its "rope", drawing a perfect circle. I would have loved to have used a jigsaw fence for this, but I could not find one longer than about twelve inches! Once the circle's on, you just cut it out with a jigsaw. Voila!

There are two striking features on this table when it's finished. The first is the lovely simplicity of the top. The second is the elegant and intricate single leg or column supporting it. The leg starts out, though, as a simple box. I used clamps, Gorilla wood glue, and my Ryobi Airstrike Brad Nailer (my absolute favorite tool - a nailer without the fuss and noise of a compressor!) to put mine together, but you could definitely use finish nails and hammer as well!

I set my boards up on the saw horses in such a way that the bottom board was clamped down, but the edge of the standing board was available for me to nail into. Once the nails are in, they'll keep the wood in place to let the glue dry, so you can flip the whole thing around and do the other side.

The two braces on the bottom of the table top that the "leg box" sits in were challenging for me. The boards themselves were easy to cut, of course - nothing complicated there. But I really liked the simple curved cuts Shanty did on the ends of theirs - they really add to the overall finished elegance of the piece, but I wasn't entirely sure that me or my simple, inexpensive jig saw were up for the task!

They didn't come out perfect, but with a fair amount of sanding by hand, I got them where I wanted them.

Cleverly, the braces are secured to the bottom of the table top with pocket hole screws. The screws are hidden from view by the boards themselves, and the precision of the Kreg Jig allows you to drill into the table top without worrying about coming out the other side (it's only about ¾ inch thick)!

All of the angled cuts for the feet were easier than I expected. You need a miter saw, of course, but that's basically it. Swing the angle adjustment on that miter saw blade back and forth to get the cuts you need, take your time, and be as precise as you can. And remember, at the end of the day, you're building this yourself so it can be a little rustic anyway, right?

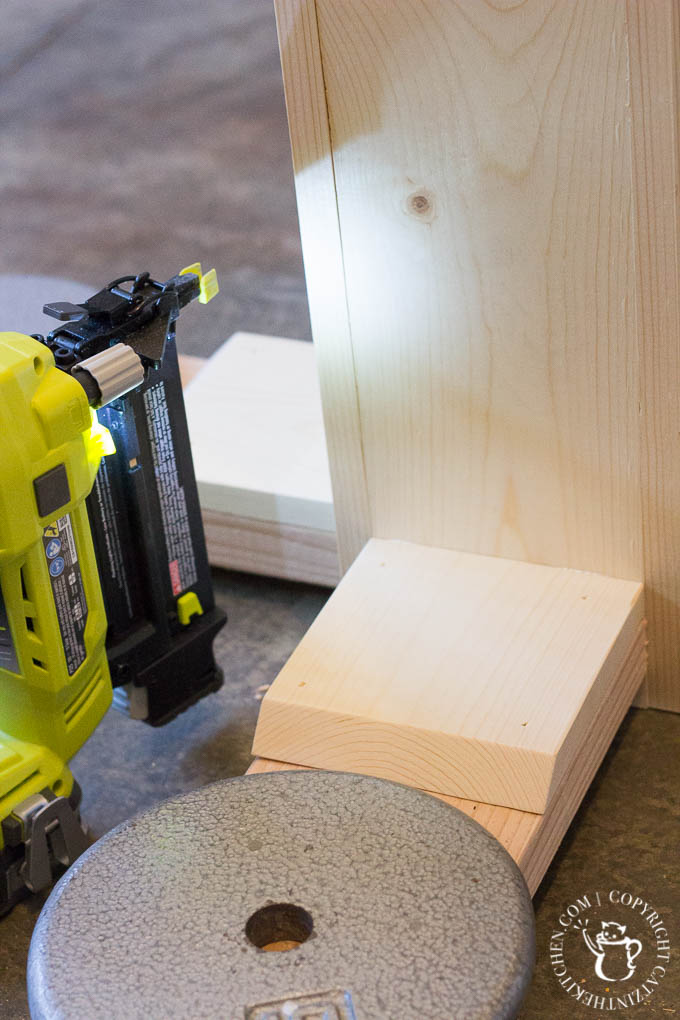
The feet and their pads are pretty beefy, and they only get more so as you go through the process of putting the different components together. A little nails and wood glue get the pads on. Obviously, it's important to get your finish nails all the way in, slightly below the surface of the pad, so they don't scratch your floors.

More pocket holes and screws will hold the feet to the column table leg, and these holes, which are actually on the tops of the feet, will be cleverly concealed by another piece of wood in just a moment.

In fact, I actually used that next piece of wood to support the feet while I screwed in the pocket hole screws - it's the same width as the pad, so the surfaces lined up nicely.

Now, I didn't want my feet to inadvertently spring up a bit or become unleveled, so I set these ten pound weights from my dumbbells on them while they dried! No dumbbells? I would think that full paint cans would work, or just about anything with some weight to it.

Next, I fished those little supports out from underneath the feet they're supporting and put them back on top where they go. No more pocket holes!
Let's talk about this next step. This was far and away the hardest part of this project for me! You're working through building this elegant stacked head and foot for the column leg, and the way it's put together is nothing short of genius. However, it involves a ton of angled cuts, a meticulous step-by-step layering process, and lots of careful nailing. Also, when you finish, you flip the whole table over and do it again! Here are some pictures to show you the step-by-step process, but let me add this - measure as you go! You're going to have variations of an eighth or a sixteenth and they really matter here. I'll say it again - measure as you go! Also, I did have a few joints that didn't come together quite the way I wanted, especially with the moulding. I was able to use some caulking to fill in the tiny gaps - after all of the sanding, staining, and finishing, they aren't noticeable. Thank goodness!


When flipping the table over to start on the top column cap, I used a couple of scrap pieces that were the same height as the braces to hold the first row of trim in place. This gives you a solid support while you get those finish nails in there.

Once the column is competed, you're just about ready to throw the top on!

Before you do that, though, take a moment to step back and appreciate what all of those simple steps and hundreds of cuts did - that's a pretty elaborate-looking table leg!

Now's a good time to set the top on the column to make sure it fits, but don't fasten anything together yet - it's a lot easier to finish sanding and staining these pieces separately, not to mention getting them in the house!

Take your time with the sanding and staining, by the way. While the column is obviously supposed to be pretty angular, I did a lot of sanding it by hand with a folded up sheet of sand paper, finishing off rough corners and smoothing out the joints. The rest of the table - the surface of the column, the feet, and, of course, the top, can all be done with electric sanders. Get that top nice and smooth!
We gave ours two coats of Miniwax's Weathered Oak wood stain - it was just the light, weathered look we wanted. It tones down the blond look of the raw lumber, but keeps it light and airy. The second coat makes all the difference, by the way. If you choose a similar stain, don't get discouraged after that first coat - wait for coat number two! When the stain's done, finish it off with three coats of poly. Don't skip this step! We used a matte poly finish to avoid making the table glossy and shiny - definitely not the look we were going for! The matte finish feels good, protects the wood, and preserves its rustic elegance.

We brought it inside in two pieces, screwed it together with four big wood screws, and that was it!

Now...what about the chairs? Obviously, this isn't exactly a table and chair set that you pick up at your local discount furniture store. Well, we hunted around for quite awhile. We kept an eye on Craiglist, took frequent strolls through Goodwill, and dropped in at our local secondhand furniture and antique store. Eventually, we found four of the "cross back" farmhouse style chairs we were looking for. Now, they don't match. We found two of them at Goodwill and two at the secondhand store, but they are close enough that you wouldn't notice except under close inspection.
The chairs weren't in great shape, and they were the wrong color, but with some sanding, some linen white Rust-Oleum Chalked paint, and a little spray-on chalk paint clear coat, they brightened right up.

Chels stumbled upon a set of four jet black bar stools in a similar style on Craigslist for $50, and so we decided to expand our ambitions to the bar across from the new table as well.

All that was left to do was distress these eight "new" seats! I used my Ryobi Corner Cat sander to go over the edges and obvious spots where you would normally find wear and tear. I didn't go overboard - just enough to take the newly finished gleam away. Here's a sample contrast.

We got the chairs in around the table, added some fresh flowers and place settings, along with some comfy cushions, and I don't know that we could be happier with the result!

The stools really brightened up the space as well, not to mention giving us a lot more seating! This is where the kids hang out, well, pretty much all the time! Plus, when we're all sitting at the table together, we just spin one of the stools around to give Christian a perfect place to sit.

So, what's the lesson for me in all of this? Listen to your wife, obviously! I may never quite get that right every time, but I'll keep trying... In the meantime, don't be afraid to give this project a shot if you could use a new table at your house! Shanty2Chic claims that they did this for about $70 in lumber, and I think that's pretty accurate. You'll need stain, of course, along with glue, nails, and finish, so count in another $30 or so for that. If you need to buy some tools, that can add up, but they can be a great investment! We've had the table up for about four months now, and it's survived heavy, daily use from the kiddos, multiple spills, and many meals, not to mention quickly becoming the central gathering point for projects, studying, and just hanging out with a cup of coffee! Give it a shot!

More DIY projects here at Catz!
Original post and plans at Shanty2Chic!
Paints and stains from this post:


Karen @ The Food Charlatan says
I love this table! You guys are so dedicated! I love the farmhouse table tutorial too. So gorgeous!! Come build me some furniture please! :) You're up for hire right? :)