Ever thought about turning your concrete slab into a covered deck? It's definitely doable! Here are some thoughts, tips, & photos from our experience!

Well, this post has been a long time coming. We completed our wood deck covering for the front of the house back in the spring of 2017, and published that post at the same time I actually started this project, which was a much larger undertaking! Shockingly to me, that post about turning a cement porch into a wood deck has become one of the most popular posts here at Catz, and I've had a number of people ask for this post about the back deck. My plan was to publish it last summer, but it ended up being a surprisingly busy season for us, so here I am shooting for this spring!
If you read the post about the front porch, then you already understand the overarching reasons why we were considering creating a wood deck in the back as well. Not only is the concrete slab not warm or welcoming, it's also uncomfortable for bare feet and challenging to create a real outdoor living space out of. Unlike the front porch, though, which was already covered, the back patio was not - just a big 'ole concrete slab. As we started thinking about patio coverings, though, Chels and I realized we had two big concerns. First, what about our light? The back wall of our house has very large windows, and a huge percentage of the downstairs gets its natural light from them. A traditional metal or shingled back patio roof would dramatically reduce the amount of natural light getting through. Second, how to avoid the outdoor space seeming a little claustrophobic? The roof would obviously have to be slanted for rain runoff, and a ceiling of seven or eight feet could quickly feel suffocating.

An idea began to develop, and after sketching it out and doing some research, we decided it was plausible - a peaked, 12-foot, clear roof to cover the new deck. It was certainly going to be a little more complicated than a straight, slanted roof, but we thought the potential benefits were worth it. At 12 feet, it would be high enough in the center to feel open and airy, while the clear roofing would let lots of light through during the many, many gray days here in the Pacific Northwest. That was the idea anyway...
I'll divide this post into (at least) two sections (maybe a third for decorating and aesthetics): Building the patio cover, and building the deck. I built the patio cover first because I wanted to be sure that it was secured directly to the concrete pad, rather than resting on the deck. The design I had in mind for the patio roof was very lightweight, but since I had the option of securing to concrete, that's what I wanted to do. Before we get started, I'll make the same disclosure I've made in the past - I'm an amateur! That will be obvious as we go forward, I'm sure! My goal here is not to instruct you on how to execute a similar project, but merely to share my experiences, what seemed to work well and what didn't, what I would do differently, and so on, in an effort to make your experience better and easier should you embark on your own patio building endeavor! Naturally, any DIY project you take is always at your own risk, check your local building codes before you start, etc, etc - you know the drill (no pun intended).
Building the Patio Cover

I realized, too late, of course, that I didn't take a good "before" picture for this project, but the above "step 1" shot will do the trick, I think. You can clearly see the concrete pad we had to work with - it measures about 12 feet deep (from the house wall to the lawn), and about 24 feet long. It was also slanted, in order to guide water away from the house, but I did not realize how slanted it was! Chels said she had always noticed the dramatic slant (especially when placing things on the outdoor table), but upon measuring it, I found it dropped a full four inches from the house to the grass! Four inches over twelve feet was much more than I bargained for when I was drawing this project up on my notepad, and I knew that compensating for it was going to be a fair amount of work...
The first part was relatively simple. Before erecting the 4x4's, I cut the ones closest to the house down about four inches so that the tops of the posts would be level front to back. I attached plastic post anchors to the bottoms of the 4x4's, and then secured the plastic post anchors to to the concrete using my hammer drill and nail-in concrete anchors. The plastic posts do a couple of things for you - first, they make it easy to mount, erect, straighten, and level the 4x4 posts. Secondly, they keep the post itself elevated off the concrete just slightly, so the post base will never be sitting in water as time goes on.

Once the posts were up, straight, and level, I connected them with a series of 2x6's. You can see the overlapping and doubling method I used in the pictures, but, basically, the concept was to use side-by-side 2x6's on the inside and outside of each post, with small post-width (3 ½ in) 2x6 chunks as braces on the sides. No braces were needed on the "front" (lawn-facing) side, as the four posts there acted as their own braces between the 2x6's. For the long, 12-foot stretch from front to back however, I wanted to make sure that would be sturdy - hence the two braces between the 2x6's on each side.
As you can see in the picture, I did secure the frame of the patio cover to the studs in the side of the house. It took a little doing to figure out where they were, a secret Hardiplank doesn't give up easily! Turned out they were generally located beneath the joints in the siding, so once I had established that, it was a little easier. Both the "roofline" against the house (made of 2x4's) and the 2x6 braces you can see up against the wall that come in close to the edge of the sliding glass door are secured to the house itself.

Once the posts and the frame were in place, it was time to do "the hard part" (or what seemed like the hardest part up to that point!), which was mounting the four-foot 4x4 vertically on the front, and then lifting the two 12-foot 2x6's up 12 feet in the air to form the roof's "peak". Since I was flying solo for this part (for the record, I don't recommend lifting lumber this size 12 feet in the air on your own, but, in all fairness, they don't weigh that much), I secured the 2x6 joist hangers in place against the house first, set the back end of the 2x6's in them, and then put a couple of wood screws in the sides of the vertical 4x4 that I could rest the 2x6's on while I secured them in place.

Once the 12-foot 2x6's were up, completing the "peak" of the roof, I braced them with 3 ½ inch long chunks of 2x6, as with the long sections on the lower part of the structure. I secured the 10-foot 2x4's I was using as rafters to the peak and the lower frame using hurricane ties. I debated using 2x6's for the rafters instead of 2x4's, but given how light my roofing material was going to be, I decided 2x4's would create less strain on center "beam" I had built to hold up the peak.

With the 2x4 rafters in place, I strung 2x2's horizontally across the rafters to create grids to secure the roofing to. (I was also able to use the 2x2's to correct some minor bowing in the 2x4 rafters, attempting to keep everything as square as possible.) For the end rafters (front and back), I ran additional pieces of 2x2 along the top surface of the 2x4's between the horizontal 2x2's, in order to create a level surface to "close out" the roofing.

The roofing itself mounted using a series of "closure strips" made expressly for the purpose. I used wooden closure strips for mine, but it appeared that the company that makes them (Suntuf) was in the process of phasing them out and replacing them with plastic closure strips at that time. When I look for them now, I can only find the plastic ones, so those are what I'll link to. I used the straight, level closure strips at the ends (front and back) of the roof, and I used the "wavy" horizontal closure strips along the horizontal 2x2's. This created a surface (as the company intended) perfectly suited to support the clear corrugated panels I would be attaching.

I realized months later as I was going through these pictures that I didn't take a single picture of putting on the roofing! To be honest, I was a little intimidated by the task - way outside of my comfort zone and any areas of expertise I might have, so I was pretty focused on just making sure it went up correctly. Also...12-foot panels of polycarbonate roofing, while feather light, are just a wee bit unwieldy. So, my apologies for the lack of photos here, but I'll at least explain my roofing material selection.
I already explained why we wanted clear panels (light is at a premium here in the PNW!), but there were still different tints to choose from - blue, purple, etc. I went with a true clear panel for the same reason - maximum light. Secondly, you can save a little money (about 30%) by using PVC panels instead of polycarbonate, but since I was roofing such a small area (something like 240 square feet), I decided to spend the extra $100 or so and go with the polycarbonate. Everything I had read about these panels was encouraging, and since we get a fair amount of intense weather all year long (lots of rain, some hail, some wind, some snow, some ice...even some sun...), I wanted something that was light, yes, but also strong. The combination of the limited lifetime warranty, UV protection, and Suntuf's (apparently justified) claim of being "virtually unbreakable" sold me. (This post is completely unsponsored, and unaffiliated with Suntuf, Home Depot, or any of the other products or brands mentioned herein.)
Despite my nervousness about putting up the roofing, it went smoothly. Frankly, Suntuf has designed a pretty foolproof system, assuming you can work out the logistics of where to stand and start. I put on the panel closest to the wall of the house first, pre-drilling each hole (per the instructions that come with the roofing), and then securing the panel with the screws that are sold expressly for this purpose (they have little rubber washers that seal the holes as you tighten them). I did try attaching some flashing to the wall of the house that would connect with the roofing panels, but with out horizontal Hardiplank, that was a total non-starter (and some wasted money, unfortunately). In the end, I just caulked the heck out of the seam where the roofing panel meets the wall. Not fancy, but we're two winters in with no leaks (knock on wood...).
After getting that first panel on, I just proceeded one panel at a time, working my way towards the front of the patio, eventually securing the last one from a ladder standing on the lawn outside the cover itself. The trickiest part was probably putting up the ridge cap as I went, mostly because of how high in the air I had to be to do that, but also because it was longer than a single panel, meaning I had to do two panels and then reach back to secure the ridge cap. I'm known to take some stupid risks from time to time while DIY'ing (don't do that...), but this was one situation where I had Chels or Grace come and spot me, used my safety gear, etc. Falling 12 feet onto concrete is no joke. On that note...

DIY Roof for Covered Deck
Ever thought about turning your concrete slab into a covered deck? It's definitely doable! Here are some thoughts, tips, & photos from our experience!
Materials
- 7 8-ft pressure treated 4x4's
- 8 12-ft pressure treated 2x6's
- 4 8-ft pressure treated 2x6's
- 14 10-ft pressure treated 2x4's
- 17 8-ft pressure treated 2x2's
- 6 4x4 Plastic Post Anchors
- 1 50-ct box ¼ in. x 3 in. Steel Hex Washer Head Wood Screws
- 12 26 in. x 12 ft. Polycarbonate Roofing Panel in Clear
- 28 18-Gauge Hurricane Ties
- 10 packs 24 in. Horizontal Wood Closure Strips (sold in packs of 5)
- 4 packs 24 in. Universal Vertical Wood Closure Strips (sold in packs of 5)
- 8 boxes Woodtite 2 in. Fasteners (50 per box)
- 8 18-Gauge Galvanized Hurricane Tie
- 3 boxes External Hex Flange Hex-Head Structural-Connector Screw (100 per box)
- 1 3 in. x 7 in. 16-Gauge Galvanized Heavy Tie Plate
- 24 hammer set nail drive concrete anchors
- 1 box 2 ½ in. star flat head wood deck screws
Instructions
See detailed instructions in post with pictures.
Notes
These materials and quantities are approximately what I personally used for this project. If you choose to try a similar project for your home, you will undoubtedly find that you need slightly different quantities and sizes to fit the peculiarities of your space and home. To wrap the posts, which I recommend, see the additional information at the end of this post (additional materials needed will vary depending on the size and quantity of your posts, but for me, the wrapping came to about $25 per post).
Building the Deck

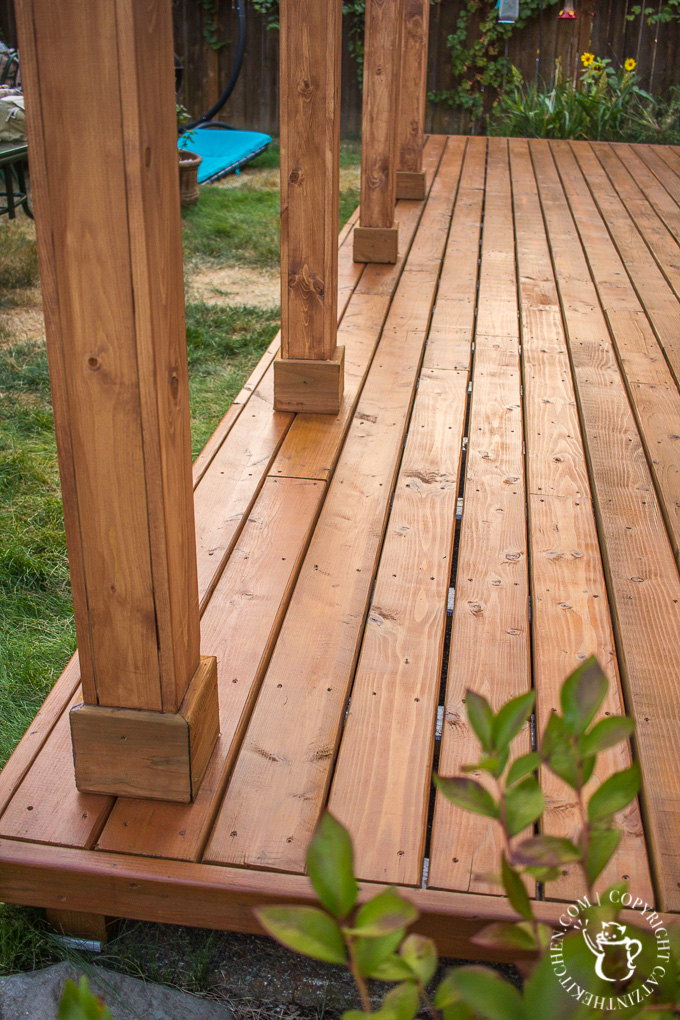
Well, I mentioned earlier that I thought getting the "peak" of the patio cover in place was the most challenging part of this project up to that point. It was, but it was, frankly, a walk in the park compared to putting in roughly 120 support blocks for the actual deck itself! At the beginning of this post, I talked about my discovery that the concrete pad was slanted rather dramatically. To compensate for this, rather than putting the sleepers down right on top of the spacers like I did for the front deck, I was going to have to find a way to level things out. The solution I decided to go with? Lots of little 4x4 "blocks", secured to the concrete on top of PVC spacers. They were cut to different heights (just a spacer against the wall of the house, and then getting slightly taller progressing towards the front of the deck, until the final one, on the edge by the lawn reached almost four inches tall. This allowed the sleeper (the 12-foot 2x4) to lay atop them and be level. Any rain that hit the deck would run through the gaps in the decking onto the concrete below, and continue to flow down the slant to the grass, as intended. The PVC spacers would keep the 4x4 blocks from sitting in any water.

For the taller blocks, I had to hollow out a space for the concrete anchors, as otherwise the anchors would not reach all the way down through the block, through the PVC spacer, and deep enough into the concrete. This part of the project was, frankly, my least favorite. I was working on it in July, a particularly hot one for us here in Oregon, and the temperatures were north of 95 degrees. Now, I LOVE the heat, but coupled with burning through masonry bits, overheating hammer drills, and lots of concrete dust...let's just say 120 of these felt like a lot.

Once they were all in, though, it was smooth sailing! I laid my 12-foot sleepers out over them, fastened them down with deck screws, and made a few cuts here and there to get around a post or make room for a crawlspace vent. After I had all of the sleepers laid and screwed in place, it was time to cover them with flashing tape. If you read the previous post about the front deck, then you know I used some pretty heavy duty flashing for that one. Here, I scaled back a bit, primarily due to cost - using that black flashing tape would have run me a few hundred extra dollars on this project, so I settled for a thinner 3M product. The flashing tape is primarily an extra precaution anyhow, so I'm inclined to think it's more than sufficient here.

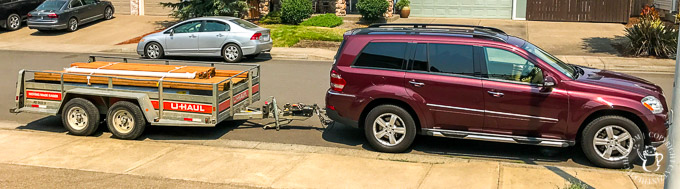
With the sleepers down and the flashing tape on, it was finally time for the exciting part - laying the decking! This is, of course, not the largest deck in the world, but it was still almost 300 sq ft, so I had to buy a lot of decking (or it seemed like a lot to me!). I'd had Home Depot deliver the posts and 2x6's for the patio cover, along with the roofing, but I decided to go ahead and go get the decking myself. I didn't have my truck yet, so I borrowed Chels' SUV and grabbed a U-Haul - worked out fine!
We went with standard decking here - unlike the sleepers, where I purchased ground contact pressure treated lumber (out of an abundance of caution really), the decking itself was still pressure treated, but for above-ground use. Lots and lots of 8-foot 2x6's (this is just part of the stack!).

I spaced my decking out with gaps of about ¼ inch between the rows, being sure to always end a deck board over a sleeper so they had plenty of support. Again, this deck is super straightforward (it's a big rectangle), so nothing fancy here other than cutting around deck posts and that one pesky crawlspace vent. Otherwise, the job was repetitive, but easy and fast with my impact driver and miter saw at the ready.
 Once the decking was down, I trimmed it out using pressure treated 2x4's around the outside edges, cleaned the deck with wood cleaner, and stained it using a transparent waterproofing wood finish. Originally, we had planned to actually stain the deck, but after seeing the color of the decking, we liked it and decided we just wanted to waterproof it, not change it. The deck was down - now, for the posts, shade, and decorative touches!
DIY Wood Deck over Concrete Slab
Ever thought about turning your concrete slab into a covered deck? It's definitely doable! Here are some thoughts, tips, & photos from our experience!
Materials
- 4 8-ft pressure treated 4x4's
- 85 8-ft pressure treated 2x6's
- 4 8-ft 1x4 PVC White Flat Casing
- 4 12-ft pressure treated 2x4's
- 20 12-ft (ground contact rated) pressure treated 2x4's
- 6 rolls 4 in. x 40 ft. Flashing Tape
- 4 packs #9 x 2-½ in. Star Flat-Head Wood Deck Screws (5 lb.-Pack)
- 2 packs ¼ in. x 3-¼ in. Hex-Washer-Head Concrete Anchors (75-Pack)
- 1 gal Transparent Waterproofing Exterior Wood Finish
- 1 gal All-In-One Wood Cleaner
Tools
Instructions
Please see detailed instructions in post.
Notes
These materials and quantities are approximately what I personally used for this project. If you choose to try a similar project for your home, you will undoubtedly find that you need slightly different quantities and sizes to fit the peculiarities of your space and home.
Wrapping the Posts, Adding Shade, & Decorating
Wrapping the Posts
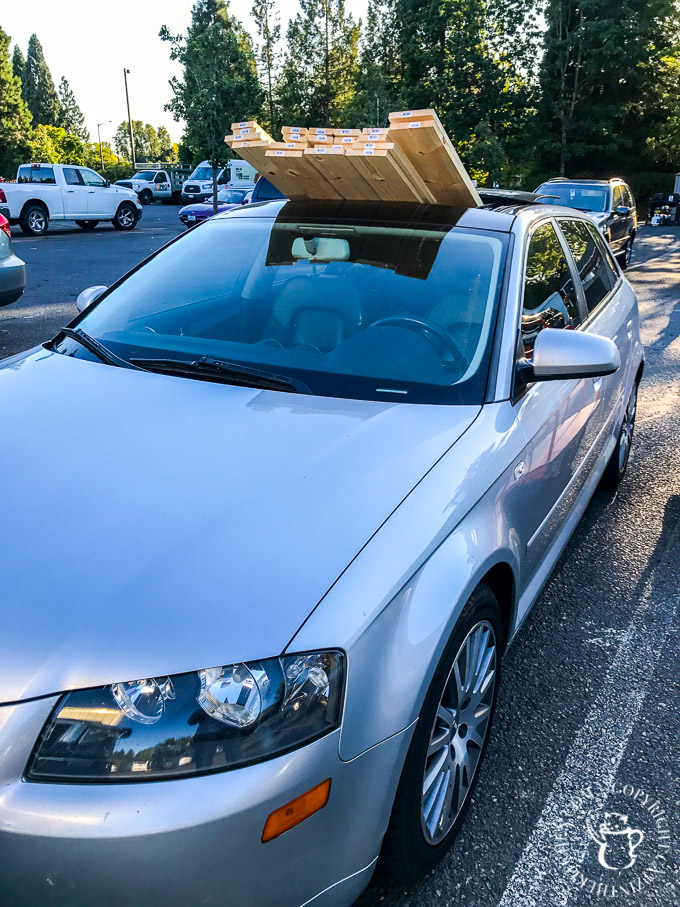
We knew we wanted to wrap the 4x4 posts to make them chunkier and more visually appealing, so that became the next part of this project. I picked up the 1x6 and 1x4 pieces of wood I would need...in my car. This was one of the times I realized I needed to get a truck. In retrospect, it would have been convenient to have the truck before I started this project...but at least I had a sunroof! 
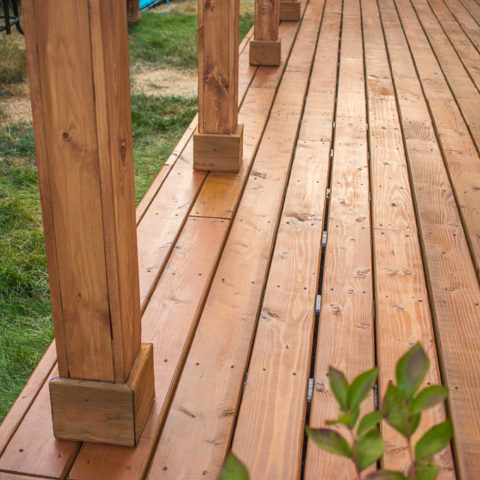
I started with these "base caps" (yeah, I just made that up) at the base of each post. Each one was made from 2x6's cut at 45 degree angles, allowing them to fit together (relatively) well.

Once these were in place, I did the same exact thing at the top of the posts, but with 2x4's instead. I felt like the differences in the cap size from top to bottom would make the posts look slightly more sturdy (this is purely aesthetics), and that seems to have been worked out pretty well.

With the top and bottom caps in place, it was time to actually wrap the posts. I did this by alternating 1x6's and 1x4's around the post, facing the 1x6's in towards the house and out towards the yard, while the 1x4's faced each other side-to-side. My thought there was that there would be seams where the 1x6's and 1x4's came together, and you'd be less likely to notice them as much between the posts, as opposed to the sides you're going to see all the time.

I used a series of bar clamps to hold the 1x6's and 1x4's in place while I fastened them to the post and to each other using Liquid Nails and my cordless Ryobi nail gun (which I have gushed about, unsponsored in other DIY posts...).

You can see that there were small gaps between the 1x4's and the 4x4's, because the 1x6's were slightly wider than the 4x4's plus the 1x4's. I could have cut the 1x6's down by half an inch and eliminated that, but there was really no reason to - again, these aren't structural - purely decorative.

Once the posts were wrapped all the way around, we used the same reddish-brown waterproofing stain we used on the front porch deck to treat them. We used the stain instead of the clear treatment because, of course, these wrapping boards had no color on their own. The stain actually brought them very close to the color of the pressure treated decking, which was perfect!

Here's a shot that shows how closely the color tones came together - it wouldn't have mattered too much if they had been a little less matched, as the whole thing is clearly very rustic, but we were pleased by how it worked out jut the same.
When I finished wrapping the posts, I decided to go ahead and add four support braces for the aforementioned long stretches of 2x6's between the house and the front of the patio cover. Each of these little 4x4 braces adds a little additional stability to the overall structure of the cover, but also just looks nice!

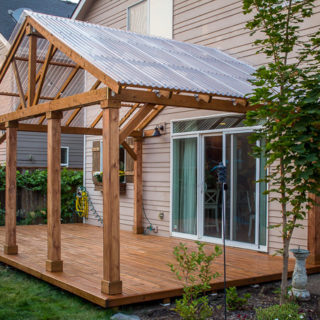
Once the braces were put up and the posts wrapped, the actual deck and patio cover was done. I was pretty pleased with the overall result, though, of course, nervous to see how it would withstand our wet, unpredictable winters here in the Pacific Northwest!

Adding Shade
We knew that despite our decision to go with a clear roof for maximum light during the long rainy season, we would want a way to have shade during the summer. I debated a lot of possible solutions, but in the end went with these amazing Coolaroo roller shades, mounted to the peak of the roof, one on each side. They stay up there all year, sheltered from the elements, and then I can pull them out and secure them to the four corners of the patio roof during the sunny months! Not only do they create the intended shade, but they create a really pretty "sun sail" effect, too.

Finishing Touches
Beneath the shades, we strung up some solar powered string lights, which turn themselves on and automatically with the sunset. In the corners of the patio, I mounted these battery powered Ryobi speakers, which seemed to strike the right balance between ruggedness (I leave them out during the summer a lot of the time), battery life (they run something like 30 hours on my standard Ryobi tool batteries, which I have lots of), price, and sound quality. We actually plugged an Echo Dot into them so we can play the same music on the patio as we have playing in the house - a small thing, but we love it!

We did, of course, build a new outdoor table for the patio, based on the ones we saw at the Magnolia Silos a few months before we started this project. It fills up a lot of the space, but we use it constantly - it seats a bunch of people when that's the need, is great for games or for the kids when they want to hang out and read or whatever - really a versatile space in that respect, even though there's a big long table in the middle! Beyond the table, I put some hefty screws in the space between the 2x6 beams on the front of the patio cover for hanging flower baskets, and we added a cute little macramé swinging chair for tiny Ruby (who was born just a couple of weeks after I finished this project!). We reused the cedar holiday planters I built for little trees at Christmastime and filled them with flowers between the columns as well.

At this point, I'm calling this project a success for two reasons - one, it's gone through two Oregon winters and it's still standing! Two, we live in this space during the summer and early fall. It has truly become an extension of our house. We grill and eat meals, occasionally entertain, play games, and just sit and talk, all in this space, which we rarely used when it was just that uncomfortable, but solid, concrete pad. In the evenings, Chels and I can almost always be found out here after the kids are in bed, one of our little citronella torches burning, some relaxing music playing, just chatting and decompressing outside.
We might add a pergola over the far left side at some point. We might add a patio heater (we have a natural gas hookup out there). We might extend the decking to cover the walkway under the window on the far right. You're never done DIY'ing...am I right?


Elena says
We are looking to do something very similar to this on our deck but my husband was thinking we would also need gutters on it. Did you have to add gutters and if not do you find water just dumps onto the deck in heavy rain?
Joshua Rief says
Hi, Elena - good question! We didn’t put on gutters. On the east side, the water runs off into the bark dust, and we just put down some river rock there to absorb the splashes. On the west side, where the deck extends out from underneath the covering, it runs down onto the deck surface, and runs down between the decking. Hasn’t really bothered us at all.
Gerald Bennett says
There is no Ledger Board that attaches for floor joists to the house. Code minimum size is a 2x8. You might have gotten away with this if the roof were not attached to the house.
Joshua Rief says
Thanks, Gerald! I checked code here before I built, and there were no requirements because of the small size. I’ve also had it inspected a couple of times by professionals, and they gave me the green light as well, so as far as I can tell, we’re good. Of course, code varies county to county, so could be totally different in different places!
A.M. says
We also live in the Pacific NW and decked over a cement sidewalk back in the early '80s... worked out quite well, but do be aware that the cement beneath your deck will pretty much stay damp all year and smell funky. Didn't really notice ours doing so (it's outside) 'til we had to replace it, then... HOLY SMOKES it was FUNKY!! Had it demo'd out and started fresh. Would love to do the same out back, but fear the vibration of the jack hammer might damage our septic tank, so...
Question... have you had to address the problem with the moss/green gunk on the panels yet? How do you maintain/keep them clear (my neighbor's are green now)?
Thanks for the DIY!
Joshua Rief says
Hi, A.M. - It's interesting - we haven't had to deal with the funky smell issue! Maybe as you said, we would only notice if we had to replace it, but I've got down there to run some hoses and stuff, and it's stayed pretty normal so far. Maybe the slant and the spacing? Not sure.
No, we haven't had any problems with moss / green on the panels. It's been four years (a little over) since we installed them, and I keep expecting to need to pressure wash them every year, but so far...no need! They are on the side of the house that gets a lot of wind, and a ton of son during the summer - maybe that's enough to keep them clear?
mike says
I'm looking to put sleepers on the concrete slab in my basement to level it out. Trying to figure out what to put between the wood and concrete as a moisture barrier. PVC is softer than wood. How did you determine that the PVC blocks have enough compressive strength the handle the load?
Joshua Rief says
Hi, Mike - interesting question. From the bit of research I did, PVC trim, while to your point not as strong as wood, still has respectable compressive load capability (something like 1000 psi at 1/2 inch thickness, and 2000 psi at 3/4 inch thickness, depending on brand, structure, etc). My whole structure is quite lightweight, and the covered portion of the deck is sitting on the concrete, not the deck surface. Beyond this, of course, the weight of my deck is spread out over 120 separate pieces of PVC trim, so the "point pressure" on any given piece of trim should be quite nominal. All of that said...I'm no engineer. But 5+ years in, I've had no issues. Hope that helps!
Candy says
Hi!
Did you put/apply anything between your house siding and the rafters attached to your house to prevent leaks in that area? Thanks!
Joshua Rief says
Hi, Candy - when I first put it up, I secured the rafters to the siding, and then caulked the roofline above the rafters to prevent leaks (which worked really well for the first couple of years). After we had to have work done on that wall (which we had professional contractors do), they reattached the rafters recessed into the siding with proper flashing.
Young says
This is what I want to do in my backyard, but my concrete level and geometry looks more complicated to have the right leveling for the sleepers.
I have 2x circle concretes and each circle concrete is divided by 4 like quadrant.
Each quadrant has different rolling off level, unfortunately. So, leveling isn't simple...
Do we use the nylon line and line level or is it better using a long enough beam level?
Joshua Rief says
Young, so sorry - this comment got caught in our spam filter and I never saw it! Are you still working on this project?
Rey S. says
That is one cool deck brother!! Beautiful done!! Love it!! And the DIY is the best part. Yes...They want to charge and arm/leg these days for any work done around the house. It use to be that labor + materials was an affordable option but today's labor cost its outrageous!! Bathroom and kitchen are out of range to remodeled, and a deck with roof falls under the same category. Very satisfying to see that this can be done for much less. Hope you have enjoyed it much since you built it last 2 years. 5 stars in my book!!
Joshua Rief says
Thank you, Rey! Appreciate the kind and encouraging words! Yes, we have enjoyed it immensely. It's gotten so much use - so gratifying to see. Thank you again!
C Time says
Do you know the dimensions of the actual covered area? I'm looking to do this but my deck needs to be 7.5in above ground to match up with our patio doors.
Joshua Rief says
Hi, C Time! The actual covered area is about 12 ft x 16 ft, so just under 200 sq ft for that portion.
Stephanie says
Absolutely gorgeous! I want one too!
Joshua Rief says
You're too kind! Thank you!
Floyd Frick says
Hi Joshua
I have a question (below):
I am in the process of designing my deck roof; I looked at many designs on the net and I find yours the best for what I want to do. ... I like the idea of doubling the 2x6's for the upper beams instead of 4x4's or something else, the doubles look stronger to me and easier to work with.
My question: What approximate roof pitch did you use? Yours looks good, but I can't tell.
Also: It appears you added the 2x2's around the perimeter of the roof, but not on all the rafters where the roof panel seams are. Did that work for you? It seems there should be support there to fasten the seams?
Thanks for any comments!
Floyd (Oregon City, OR)
Joshua Rief says
Hi, Floyd! Thanks for reading and commenting! For the slope of the roof, the deck roof is a bit over 16 ft wide, while the peak is 4 ft (believe that's correct - recalling measurements from quite a few years ago!). Since each side is ~8 ft 10 in or so, that gives you a rise over run close to 1:2. Perhaps a tad closer to 4:9. Regarding the 2x2's, they run around the perimeter, and then also across the 2x4 rafters (horizontally). Does that help? If I'm misunderstanding your question, please let me know. Also, hello from your neighbors down in Molalla! :)
Sara Boston says
Hi! I am wondering what grade/type of wood you used for the 4x4 posts and their wrapping. Thank you!
Joshua Rief says
Sara, please forgive the tardiness of this reply! We used pressure-treated 4x4 posts (ground contact) for the posts themselves, and then cedar fence panels for the wrapping. Eventually (about five years on) I did have to replace the cedar fence panels with actual cedar boards, which was obviously more expensive.