Josh and I haven't gone out to dinner on Valentine's Day in a very long time, because the restaurants are packed and everything seems to be even more expensive. So he and I always celebrate a few days later after all the holiday dust has settled. So instead of going out, we stay in and cook up a nice dinner for our family instead.
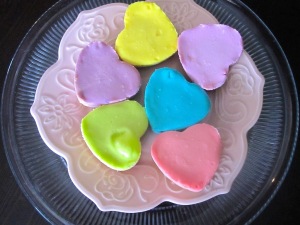
This year, Valentine's Day is falling on a Thursday and we already have commitments on Thursdays, so we're doing our nice dinner in a few days early. I saw this recipe posted on Pinterest a few weeks ago and knew I had to make it for our special night in. I had a feeling my girls would fall in love with the cute little hearts and I knew that Josh would be thrilled because the dessert was cheesecake, which is one of his favorites.
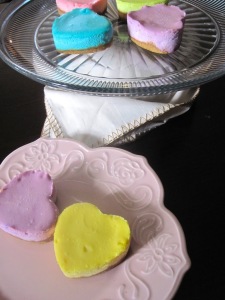
The only special supplies you'll need are fun colored food coloring and two silicone heart molds with six cavities. But if you don't have the silicone heart molds, you could just forego the heart shape and bake them in ramekins instead. I only had one silicone heart shaped mold, so for the rest of my cheesecake batter, I baked mine in ramekins for the same amount of baking time and they came out perfectly!
- Pre-heat oven to 325 degrees.
- Make the crust- Combine graham crumbs, cinnamon, and melted butter in a small bowl and stir until it's well combined and resembles sand. Spoon out a tablespoon of crumb mixture and press into the molds or ramekins, making sure your crust has an even layer. Bake for 10-12 minutes until golden brown. Remove from oven and cool.
- Make the cheesecake filling- Combine cream cheese and sugar until smooth. You can whip this by hand, or in your stand mixer just until smooth. Add heavy whipping cream, eggs, and vanilla and mix until smooth. I suggest doing this part by hand, because I used my stand mixer and it created an air pocket in one of my cheesecakes. (Can you tell which mini cheesecake it is?)
- Evenly divide the batter into 6 bowls, about ½ cup each. Color each bowl with desired food coloring till you get the color you want. I went a couple shades darker on each cheesecake because baking tends to lighten the colors.
- Fill your molds with your colored filling. Wipe off any excess filling that smears on the sides of the cavities.
- Place your molds or ramekins on a baking sheet and bake in the oven for 20-24 minutes until the top form is smooth and the center moves a bit, but isn't wet.
- Allow your cheesecakes to cool for an hour. Refrigerate for at least 3 hours, then freeze for two hours. The cheesecakes are easier to remove when frozen.
- I found the best way to remove the cheesecakes was to press the cheesecakes up from underneath and bend the sides of the silicone down. You may need a couple extra hands to help remove a few stubborn hearts; lucky for me, I had my mom on hand. Keep the cheesecakes in the fridge till about 30 minutes before you're ready to serve them. They will be creamier if they sit at room temperature before eating.
[…] if you are like me, you’ll feel guilty and make them heart-shaped cheesecakes to win them […]