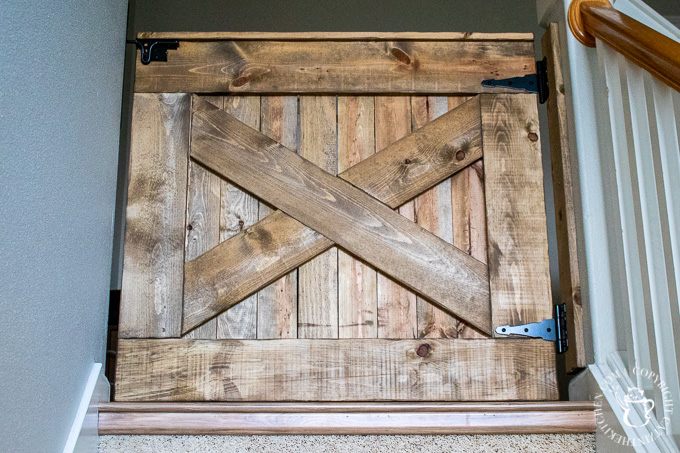
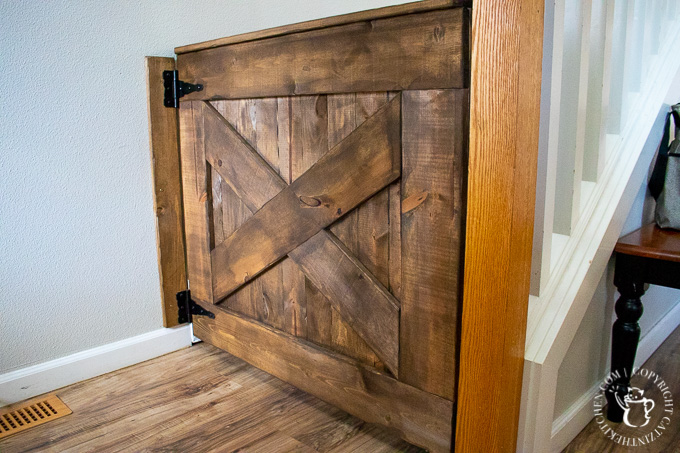
Here’s our experience with this simple project to help keep your little ones safe – a DIY farmhouse baby gate, easily modified to fit your space and style!

This was one of those projects that was born of necessity. When Christian was born, we put a plastic gate in front of the staircase in our old house, but it wasn’t as much of a concern. The staircase was relatively short, carpeted, and had a landing half way down, so the farthest a little one could really fall was a few carpeted steps. Not good, but not lethal. In our current house, the staircase is a straight shot from bottom to top, much longer, and ends in a wood floor. Also, the baby this time around is not chill baby Christian of six years ago, but Ruby, our one-year-old redhead, AKA the “fire chicken”. She’s delightful and adorable, but also feisty, energetic, and everywhere.
One plastic gate at the bottom of the stairs wasn’t going to cut it. It might keep her from climbing the stairs, but it certainly wasn’t going to do anything about her going down the stairs, plus, we were afraid that those expanding gate types (like we have) would get pushed down the stairs by the little mischief-maker. I could just see her riding the gate down the stairs toboggan-style, a little cowboy hat on, lasso in hand, red curls flying in the breeze…
 At any rate, we decided we needed something a little more substantial, and while we were at it, it might as well have some style. So, farmhouse, barn door, built to fit, etc. I found some excellent plans over at Remodelaholic, easily doubled to cover top and bottom, as well as adapted to fit the varying widths of the staircase (the top is slightly narrower than the bottom). I built the gate for the bottom of the stairs first, loved it, and then took some photographs and video of the making of the top of the stairs gate for this post. This is an extremely easy DIY project. The only parts that can be a bit complicated are adjusting the size of the baby gate to fit your space, and, of course, actually mounting it.
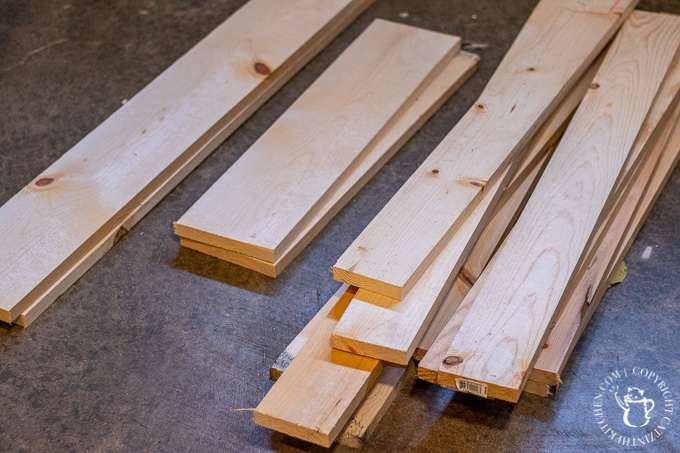
Materials
- 2 – 1×6’s (8 ft)
- 6 – 1×4’s (8 ft – you may need to adjust this depending on the width of your gate)
- 1 – 1×3 (a 6 ft board would be fine here if it’s cheaper)
- Gorilla Wood Glue
- 1.25″ T-25 construction screws (about 40-50)
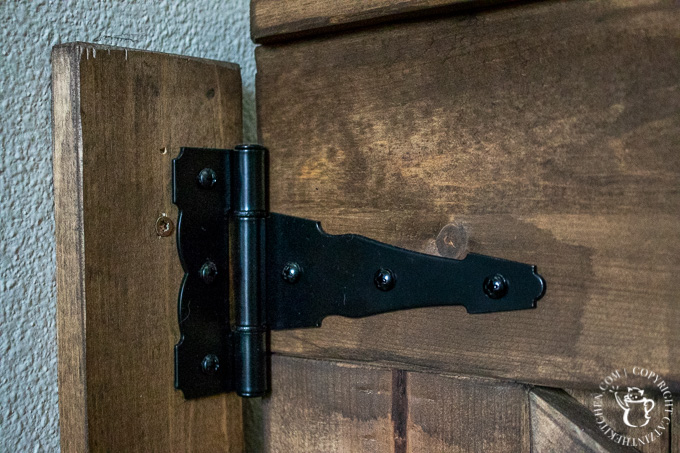
- Hinge set of your choice (I used these)
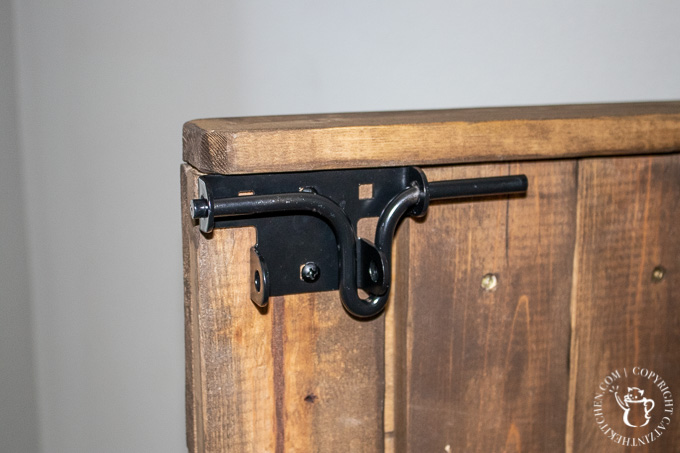
- Latch of your choice (I used this one)
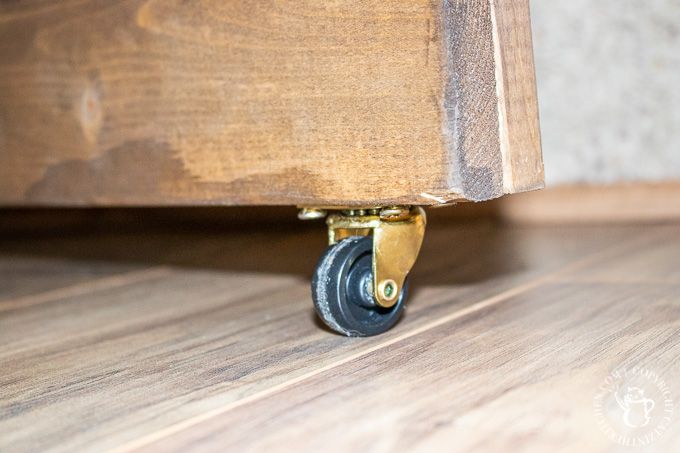
- Small ball-bearing wheel (optional – I used these ones)
- Brad nails for nailer (optional)
- Stain or paint of your choice
Links are from Amazon, Home Depot, and Ace Hardware – hopefully most of these are accessible wherever you are. Depending on the number of DIY projects you have going, you may have the screws, glue, and stain on hand – heck, you may even have some of the lumber left over from other projects, as these are really, really common pieces (I did!). Regardless, your total cost here shouldn’t be more than $75 or so. As far as tools go, I used the following:
- Miter saw
- Speed square
- Impact driver (you could use a regular drill if you don’t have one)
- Brad nailer (you use more screws or a hammer and nails if you don’t have one)
You’ll also need standard tools like a tape measure, carpenters’ pencil, a sander, staining pads, and any additional bits needed to install the gate hardware you choose.
Building the Gate
You’ve got to do a bit of measuring to decide how wide to make your gate. Remodelaholic‘s plans are for a gate that is 35 1/4″ wide, which obviously isn’t going to fit everybody. Mine were more like 40″ at the bottom and 39″ at the top, so each of the gates I built had slightly different measurements. You want to leave about 3/4″ or so on each side of the gate for clearance and hinges, etc. I ended up adding additional 1×4’s on the wall itself to secure the hinges to, as my studs weren’t placed exactly where I wanted them, so I had to leave extra room for those.
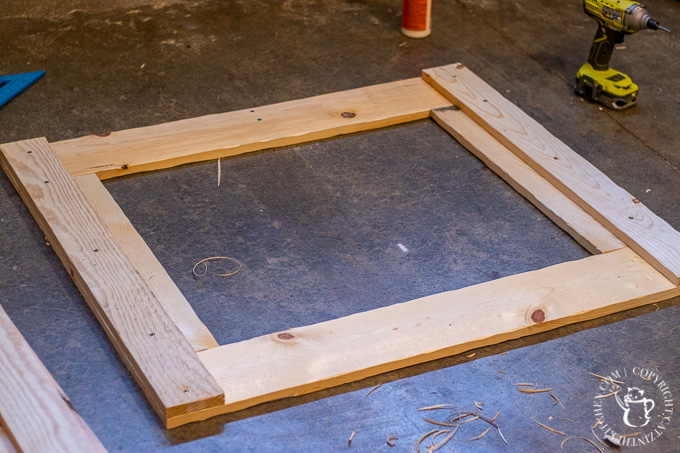
I said it before, but I’ll say it again – this is a really basic build. Anybody can do this. There are two angled cuts for the “X” in the front, but, otherwise, these are straight measure-and-chop cuts. You’ll lay out your 1×6’s in a square, as shown above, make sure everything is square with the speed square, and then use wood glue and screws to secure the first two back stiles (1×4’s) in place, which actually holds the entire thing together.

You can kind of see in the picture above that I took Justin’s advice in the original post and carved a bit of the edges off of the lumber with a box cutter. Definitely an optional step, but it adds a hand-carved look to the pieces. If rustic is what you’re going for, you might consider doing this. If you’re going to paint it white and go for a more polished look, you might want to skip it. I talk about the a bit in the video as well.
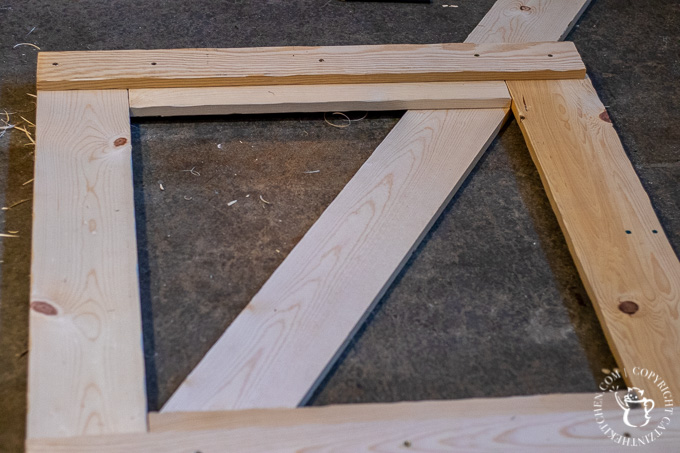
Once that basic square, or frame, of the gate is put together, you can use it to determine where to cut your cross pieces for the “X”. you’ll basically lay them out the way you want them under the frame, and then mark the cut lines. A really simple way to get what would otherwise be some pretty complex angles. I measured and cut my full length cross piece first, and then, with that one in place, measured and cut the little “arms” to finish the “X”.
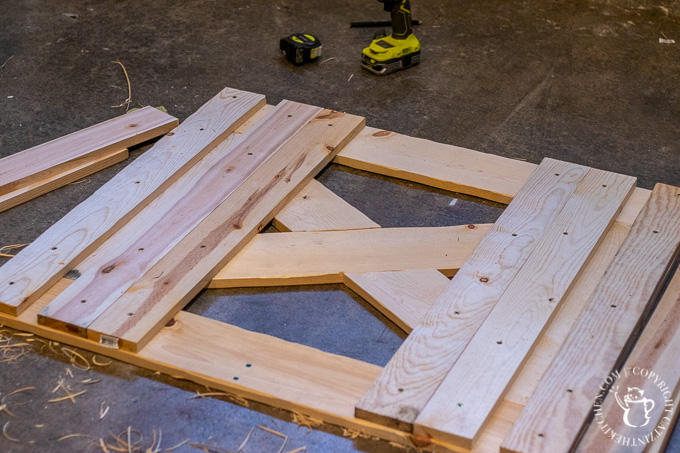
Once your cross pieces are cut out, you just want to find a very flat, hard surface (like the garage floor!), put them in place within the frame of the gate, and begin attaching your back stiles with glue and screws. The back stiles themselves are what actually hold the “X” in place. Depending on the width of your gate, you may need more or fewer back stiles to cover the whole thing. In my case, the gate was a bit wider than the plan, so I had to add one and then stretch them a bit, meaning, I gapped the first two stiles from the edge by a certain amount to fit the rest in properly (you can see this in the photo above). You could also cut a narrower stile on a table saw if you wanted to, in order to fill the space perfectly. I didn’t do this for two reasons – one, a baby gate is probably not going to be around forever, so it doesn’t have to be perfect. Two, if you place the gap where I did, it isn’t visible from the front of the gate because of the wider 1×6 that makes the frame.
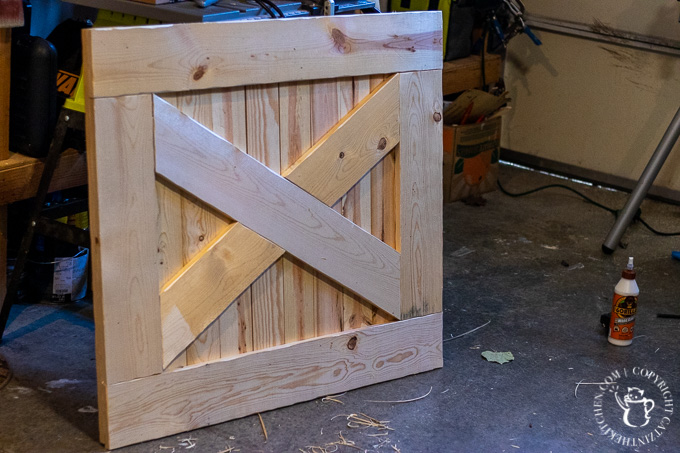
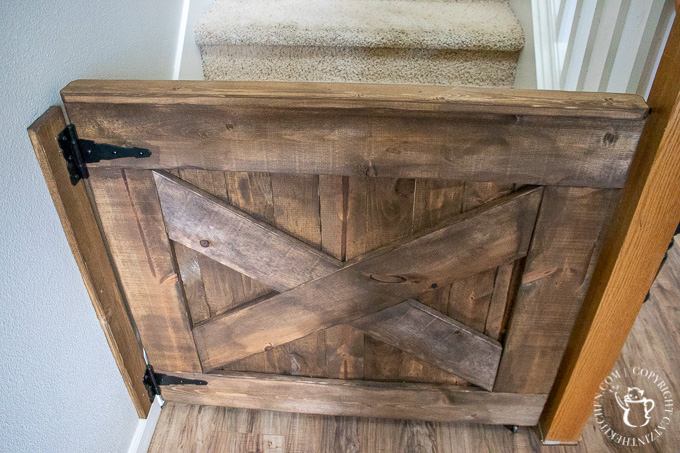
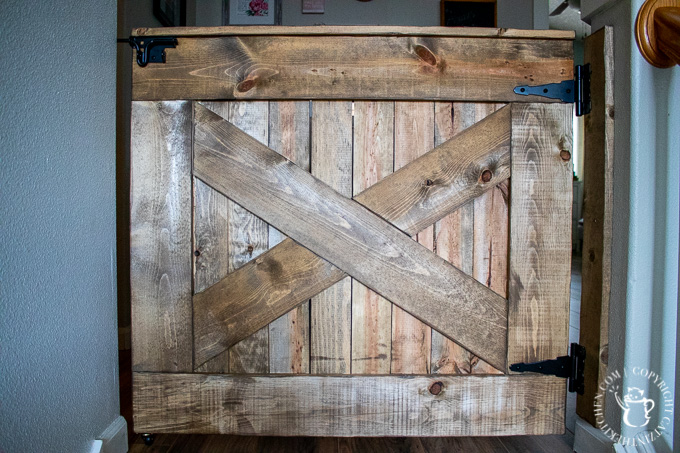
And that’s almost all there is to building the gate! When you finish with the back stiles, you’ll lift it up and you you should have that iconic barn door “X” in front, giving your gate a farmhouse feel. You’ll want to add a piece of trim to the top – I used the 1×3 and my brad nailer, along with more wood glue, to do this, which made it really easy. Sand it, and you’ll be ready to stain.
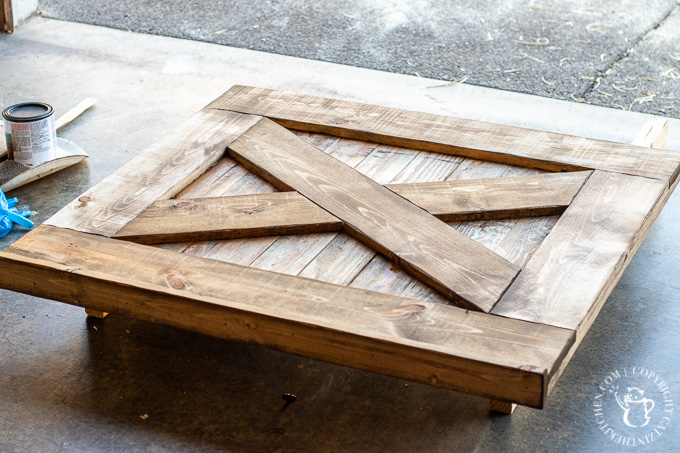
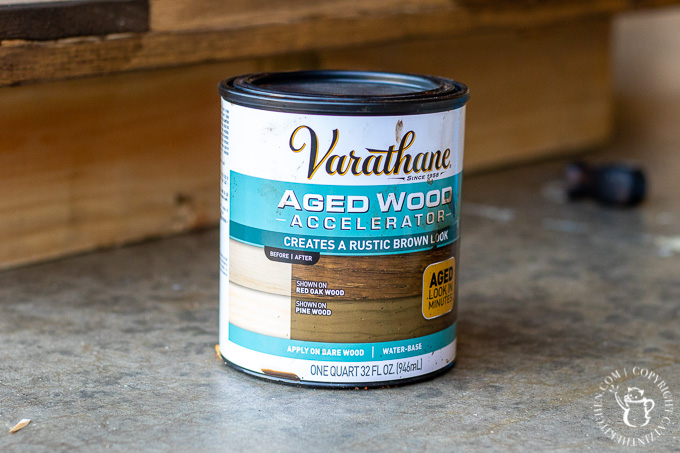
I think this gate design could look great stained dark, painted white, painted blue or gray, or even just shellacked if you were going for a cabin-y look. We chose, however, to try a new product we’d never worked with before, called “aged wood accelerator”, a Varathane product that we found at Home Depot. I don’t know how longer it’s been around, but we loved the results! With a single coat, the fresh pine or fir of the door had taken on an old, weathered look.
As I’ve mentioned a couple of times, the actual process of hanging the gate is going to vary a lot based on your stair case, wall situation, stud placement, etc. For ours, I drilled a hole in the newel post for the latch to slide into, and mounted another “stile” on the wall, secured to studs, that I could screw the hinges into. For the top gate, there wasn’t a newel post, of course, so I had to use some latch hardware to give the latch bold something to slide into. Most of these latch kits mount and secure in multiple ways, so you should be able to find something that works for you (also, looking at the picture below reminds me that I need to work on my newel posts – another project I hope to get to this winter!).
Now, I chose to put a small ball-bearing wheel on the bottom of my gate, opposite the hinges. I did this for three reasons – one, the finished gate is actually pretty heavy. Two, kids have a tendency to lean, hang, climb, etc on these gates, and I wanted to avoid gate sag at all costs. Three, I wanted to avoid putting too much pressure on the stile attached to the wall. Is the wheel necessary? Probably not, but it gives me some additional peace of mind knowing the gate will not sag.
You could certainly hide the hinges if you wanted – again, I think this goes back to what kind of look you’re going for. Chels and I wanted to use black hardware that was meant to be seen, something pretty prominent. We went with strong, but decorative black hinges – they look great, but they’re sturdy, too.
I mentioned the latch earlier. You could use almost anything to do this, of course, including a standard gate latch, but we liked this bolt slider. It secures in a bunch of different ways, which should allow you to adapt it to whatever situation you’re installing the gate in. It also requires a little coordination to operate – just enough to foil your average one-year-old (I also mounted it on the inside of the gate, just to be on the safe side…).
That’s really about it! I did decide to round the edge on the trim piece on the first gate (the downstairs one), because I thought it might rub on the wall or something. As it turns out, it didn’t make any difference. I left the upstairs one square on the edges, and I actually think it looks nicer.
We’ve been using the downstairs gate for a couple of months now, and the upstairs one for a few weeks. Both have held up great! More importantly, we’re able to let little Ruby roam around upstairs or down, and not worry about her taking a tumble down the stairs. I hope our experience building these baby gates is helpful if you decide to give it a try!
Jess
Wednesday 22nd of June 2022
This has helped me tremendously! I have looked all over YouTube for a gate I liked, and this one was perfect. One question I did have though, after using the age accelerator stain (I seriously love this stain, use it a bunch myself!), did you apply a topcoat of any kind over it or leave as is?
Joshua Rief
Sunday 17th of July 2022
Hi, Jess - so sorry, just saw this comment! No topcoat - we left it as is. It's held up amazingly well over the last four years!
Jess
Monday 3rd of August 2020
We are running into the issue that the studs are not across from each other. On our stairwell. So what would be the best action.
1. Mount that gate on the stud that is at the top of the steps and have the gate open backwards to cut the space off. 2. Mount the gate on the correct side and make the piece where the hinges mount to extra wide? Like in stead of 3 inches wide make it 8 inches wide. So we can catch a stud? 3. Put up two horizontal pieces that are 16 inches long that would catch the stud on both sides and then mount the vertical piece where the hinges are to those pieces of wood. 4. Open to other suggestions.
Joshua Rief
Sunday 9th of August 2020
Hi, Jess - my apologies for not seeing this sooner. I'm having a little bit of a hard time envisioning exactly what this layout looks like, but I think option #2 sounds pretty workable. Just get yourself a 1x8 or a 1x10 instead of a 1x4. Not a bad way to go. Also, you don't necessarily have to have studs on both sides - one side is just for the latch, which you might be able to secure with drywall anchors or something like that. I know our top gate opens backwards (i.e., not out over the staircase), and doesn't block the space too badly. #3 sounds very secure, but might look odd!
Jared
Saturday 11th of July 2020
Thank you for this! Been trying to figure out a way to keep my 7yo with autism out of the kitchen. He’s way too strong and smart for baby gates and this looks way better. Gonna pick up supplies tomorrow and knock this out!
Joshua Rief
Sunday 12th of July 2020
Glad to hear it! I hope it works out well for you! Definitely one of those projects where you can make it as tall or wide as you need to, and it is definitely HEAVY DUTY. The latches can even have a lock put on them if needed (we have considered that a couple of times!).
Ria
Saturday 23rd of May 2020
Looks so nice and would like to make one, however have a metal baluster on one side and i wonder if you have a suggestion as to how i will make this work.
Joshua Rief
Monday 25th of May 2020
Wow, that is interesting! How thick is the baluster? Based on your walls, does it make a difference which side the hinges are on?
Brandy
Wednesday 29th of April 2020
I am so excited that I found this page. Think you for your pictures and details. This is one of my weekend projects for this weekend. Aka try and do it my self until I ask my husband a question. Then he takes over lol.
Joshua Rief
Wednesday 29th of April 2020
Ha, I love it. In our house, Chels finds the projects and adds them to my to-do list. ;) Best of luck! Hope you enjoy!