Wednesday, March 31, 2010

There is a difference...

I feel that in many ways, I lived a charmed life when I lived with my parents. My mom and dad wanted to give us (they're children) a lifestyle that would be healthy and safe for us. My earliest memory is living in Northeast Portland and going to school in not the greatest area of town. One of my Grandma's lived 2 blocks behind us and she was held at gunpoint and robbed. Kids were constantly harassing my brother and I and my parents just wanted to get us out of there. So they sold our house in the city and while they built our house in the country from the ground up, we lived in a haunted rental house...yes it was really haunted.

I will always be thankful to my parents for providing me a home in such a wonderful area. They found property in Redland and over many stressful months they built us a wonderful home on 1 acre of land. One of the first things we did upon moving to the country was we got chickens. My dad built a coop and we all got a chicken and a rooster. My brothers and I were allowed one chicken a piece and my mom had a Rooster. My chicken was gorgeous and black and I named her Raven. She was an amazing bird...she used to fall asleep in my arms. My brother Dustin picked out your typical white hen and named her Mrs. Clucks and Byron picked out a more golden brown hen and named her Amity. I seem to remember the Roosters name being Dough boy...I can't remember why but he was a beautiful Rooster and I thought it was cool that he had feathers on his feet that made him look like he was wearing colorful bell bottoms. There are many downsides to raising chickens...they are filthy animals and they take a lot of work. Making sure they are getting medication if they have worms, making sure they are warm enough in the winter. Cleaning the coop. But the fun parts are they make wonderful pets if you get nice birds and they lay delicious eggs. Which is the topic of this post.

Never before moving to the country had I tasted real chicken eggs.I've always had the watered down ones from the store.  And now that I have had them for so long in my life...I have a very difficult time buying eggs from the store...the eggs are just not as good as fresh farm eggs. Anyone who has ever eaten a real farm egg would know that. Farm Eggs are beautiful. Have you ever looked at them and marveled over their beauty? Their sizes and colors are never the same. Some chickens lay these itty bitty eggs that are just so cute you almost hate to crack them open. Some of the eggs are huge and some are just a normal average size. But then you get into the color aspect of it and it makes them even more amazing. That is until you break the shell and get your first peak at the yolk. The shell will suddenly pale in comparison to the color of the yolk. It's the most vivid color of yellow and orange mixed into a rich and thick combination. You can't find anything that beautiful in the stores.

Store Eggs just aren't as pretty. It's like when you go to a restaurant and order Jello...but the person next to you orders Creme Brulee...which dessert are you going to want more...and more importantly...which is more appealing to the eye, Jello ( which they serve in hospitals) or Creme Brulee? Same thing goes with eggs...you want something that is appealing to the eye. All the eggs look the same. How yummy does that look? And then you have to muddle through the billions of egg cartons to find some eggs that are without cracks. Aside from that...we don't really know where the eggs are coming from. I have a picture in my head of all these cages elevated off the floor and filled with hens. Clucking away in distress as they are forced to stay in their small cage...lay eggs and unable to wander around and peck at dirt trying to find bugs to eat. I don't have any idea how accurate that picture is, but it's what I envision. They eat commercial feed and water. But do I know if they are treating the water with medicine so that the hens are healthy? And if so...then I hope they are not selling the stores the eggs because you aren't allowed to eat the eggs if they are on medications. 


I hate to preach. But I have questions and concerns. But I don't want to come across as I am above the buying of store bought eggs...because I'm not and I will. If my mom is unable to give me eggs then I go to the store. I will be the normal eggs. I try to buy cage free if they are not to expensive. And furthermore...I will make an effort to buy the organic eggs as well...as long as it fits into my budget. But most of the time...I will buy normal store eggs and ignore my inner voice telling me that these will not be nearly as good as mom's. But it is what it is. 


When you live in the country, it is easier to find farm fresh eggs. People are willing to sell their eggs. My mom did it for awhile when her chickens were laying a lot. It will make a decent profit because people do notice the difference. Did you know that Farm Fresh eggs are also lower in cholesterol? My only suggestions are if you can afford it buy the organic eggs first, cage free second, and normal eggs last. But if your driving through the country and you notice a sign that says eggs for sale. Do yourself a favor, buy yourself a dozen. You won't be sorry!

Tuesday, March 30, 2010

Split Pea Soup, crockpot style!

When a day is as cold, wet, and windy as yesterday was...one thing came to mind. Soup. Soup is the perfect meal to soothe the soul when the weather outside is frightful. I've had Split Pea Soup on the dinner menu for about a month now...but I needed the perfect day to make it and on Monday, it was begging to be made.

I love soup, but I don't always have the time to stand in front of my stove and stir and season, and taste. I need something quick and simple. And what does quick and simple better than a crockpot? Nothing! A couple of years ago I was on the hunt for a good Split Pea Soup recipe that didn't involve a lot of work. My mom made it occasionally because it's my dad's favorite soup...but she made hers from scratch and on the stove. I wanted one from scratch...but in the crockpot. So I went to Google it  and I came across a wonderful recipe with great reviews.

I made a few changes to the recipe to suit my needs...first off I rarely cook with onions. And I didn't have any celery. And I didn't have many carrots. In fact I had one carrot...so it had to do. But the other thing I did add was the ham. Being the lucky girl I am, my dad who lives in Vegas ( I have two dads) sent me a honey baked ham for Christmas and I am always able to get a ton of leftovers off of it. So I added my honey baked ham to the recipe and it adds a great flavor. You don't need much in the way of a side dish to go with the meal because it is so filling. But a couple slices of Rustic Bread with a little butter was the perfect companion to this meal. It's a great meal if you have several people to make it for. It makes 8 servings and freezes very well and since Josh, Grace, Eden and I weren't able to finish off the pot, I called my mom to see if my dad would like the leftovers and he jumped at it. So I have a nice hearty helping for him frozen in the freezer for him. Soup just always seems to be the meal that keeps on giving :)


Split Pea Soup

1 16oz pkg of dried split peas, rinsed
1 meaty hambone, 2 ham hocks, or 2 cups diced ham
3 carrots, peeled and sliced
1/2 cup chopped onion
2 ribs of celery, plus leaves chopped
1 or 2 cloves garlic, minced
1 bay leaf
1/4 cup fresh parsley, chopped, or 2 tsp dried parsley flakes
1 TB salt
1/2 tsp pepper
1 1/2 qts hot water

Layer ingredients in slow cooker in the order given; pour in water. Do not stir ingredients. Cover and cook on high for 4-5 hours or on low 8-10 hours until peas are very soft and ham falls off the bone. Remove bones and bay leaf. Mash peas to thicken more, if desired. Serve and garnish with croutons. Freezes very well.


This recipe is linked to:

Saturday, March 27, 2010

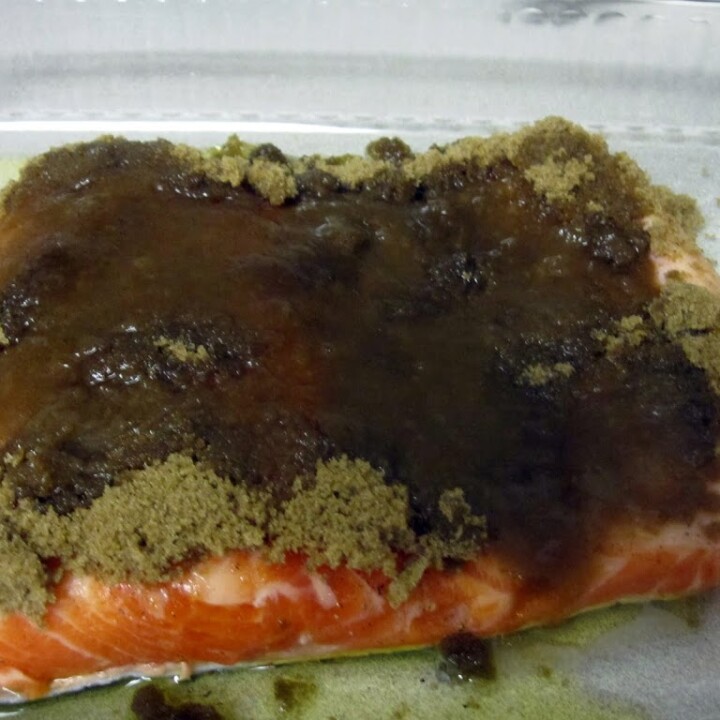
This Fish is a catch...baked Steelhead!

Fish. Some people love it and some people hate it. I have always been a fish lover. Thank goodness, I married a man who has an equal appreciation for fish as well or I don't know what I would do. I feel kind of bad for my kids...they don't really stand a chance when it comes to eating the meals I prepare. Grace is not a picky eater...but I think she would be if Josh and I weren't so determined for her to keep an open mind and to just try everything. Grace has always been a good eater...even when she was a baby. But as she got older, some things didn't always look good to her. But, Grace loves fish (she gets really excited when we make it), she likes tomatoes ( something I didn't really even like till a few years ago), and she likes bell peppers (something else I was never fond of). Grace is a kid who always cleans her plate and I think the key to having a kid who likes food is repetition. Just keep offering it to them. Eden on the other hand is so different. She is picky. But, repetition is the way we work. And I know that the older she gets, she will embrace the meals I like and grow a healthy appreciation for them as well.

Last night, I made another fish meal and yet another recipe of my mom's. At some of the grocery stores around town, Steelhead was the most wanted fish. He was on sale and lookin tasty. At $4.99lb, I was not about to pass him up (yes, my fish is a he). For those of you who are not familiar with Steelhead, Steelhead is a trout...basically a bigger version of the Rainbow Trout, but more similar to a Pacific Salmon... and it tastes more like Salmon than a trout. Trust me on this, I've eaten a lot of Rainbow Trout ( I used to catch it with my dad) and I've eaten a lot of salmon...there is a difference in flavor...but not so much with the Steelhead. So if it's on sale again...buy it, you won't be sorry, but please take my mother's advice...when at the seafood counter as for a section that is not part of the tail. I don't know why, but this is what she told me to do and when it comes to fish...she pretty much knows her stuff. So last night, I got to work on my handsome (remember he's a boy fishy) pink fish. The first thing you should always do when preparing fish is rinse it off and pat it dry with paper towels. Josh didn't believe me, but when he went to cook fish a week ago, the cookbook told him so and I won! When he was nice and dried off I put him in a 9x13 baking dish and drizzled some EVOO over him. I didn't measure, but just enough for him to have a nice swim in it. Next get out your S&P ( salt and pepper) and season him. Then comes the yummy part...Brown Sugar. Who doesn't love a little brown sugar? Sprinkle some over your fish and then pat it down...and then take some lemon juice, and you don't need a ton...maybe 2 Tablespoons is good...but you just want enough to give the fish a good flavor.

Once you've got your fish all prepared...all you have to do is stick him in the oven and your nose will tell you when he's done. Have the oven preheated till 400 degrees and put him in the oven for about 20-25minutes. I cooked mine for 25 minutes and he turned out beautiful. The brown sugar, evoo, and lemon juice work as a glaze for the fish and really that is all you need. My dad likes a little tarter sauce with his though. At about 20 minutes into the cooking your home will have a delicious cooked fish aroma ( not a stinky aroma). Josh and I bought a little over a o1 lb and that was just enough for me and him and the kids.  For side dishes, I made a beautiful spring salad which consisted of green leaf lettuce, radishes, carrots, croutons, and craisins. And I also made ahead of time this afternoon my mom's homemade macaroni and cheese. It's the perfect side dish because it also cooks at 400 degrees and takes about 45-60 minutes to cook. So there wasn't a lot of prep work with this meal. Josh perfected the meal even more by running to the store to pick up a bottle of wine... Chardonnay, which goes very well with a Salmon...but since this was close to Salmon we figured it would do.


Josh and I always work together to get all the plates dished up with the food while our hungry munchkins look on and giggle at the thought of yummy food being only secs away. Dinner time is important for families and I know that by making healthy and tasty meals I am also creating memories for my darling children, which is really what dinner time is all about. Grace is becoming more interested in food and Josh and I, only grow closer...whether I'm doing the cooking or were doing it together. It's a bonding time for us all. My mother did it for all of us kids, and now I am following suit and it's one of the most rewarding things I can do as mom.


Steelhead dinner


Steelhead fillets
Evoo
lemon juice
salt and pepper
brown sugar

Rinse off the Steelhead and pat dry. Place in a baking dish and drizzle evoo all over the top. Season with Salt and Pepper. Sprinkle Brown sugar over top and pat down so there is a layer of brown sugar over the fish. Add some lemon juice for flavor.  Bake in oven at 400 degrees for 20-25minutes. Fish is done when the fish flakes!

Friday, March 26, 2010

Real. Homemade. Delicious. Raspberry Cheesecake!

Have you ever noticed that you find yourself the happiest when you do something nice for someone else? It's true. I know I am the happiest when the ones I love are happy. For example, My Gracie...my beautiful, smart, incredible Gracie lost two teeth this past weekend and she was kind of freaked out by it. She was afraid it would hurt a lot or maybe of the unknown. But when my husband managed to get the first tooth out of her gums, she ran into my bedroom shrieking with joy. She was so happy and I was so happy for her. I remember what it was like for me to have lost my first tooth...you feel proud. So as a surprise to her for being so brave, Josh ran down to McDonalds and got her a McFlurry. Yum! I felt though, that it was important to do something nice for my hubby. He works very hard to provide for this family. And I wanted to do something for him...that I don't do very often...I wanted to make him his favorite dessert...Cheesecake.

It's been well over a year since I've made a Cheesecake for Josh. It's just so much work and really the only time I make it is around Father's Day every year for our Church's Father's Day Pie Celebration. All the woman in the church make a pie for the Father's. I don't really make pie...so I make Cheesecake. Last year though...I didn't make cheesecake. I made a yummy Peanut Butter Pie...one of Josh's other fave desserts.

Over the weekend I was flipping through the Sunday Paper and going through the coupons and when I see an ad in the manufacturer coupons sometimes it will have a delicious meal and a coupon to go along with the product they are trying to sell. I came across a Fleischmann's highly active yeast and there right along with the $.40 off coupon was a picture of a delicious raspberry cheesecake and my mind automatically went to my husband and how he would love a treat like this. I quickly scanned over the recipe that was given and since it looked fairly simple, I decided that I would go for it.

I got out all of the supplies I needed and sprayed my pie pan ( to prevent sticking) and got to work on the batter. The batter in this recipes works as the crust...which I found unusual because I've never eaten a cheesecake that didn't have some sort of graham cracker crust. But I was intrigued...the picture of the crust looked yummy. So I quickly got mixing everything together. This was my first time working with Yeast. I've never been scared of it...but intimidated...yeah...just a little.  But I was actually really excited to work with something new and different. And I quickly found out how different it was once the mixing process, (by hand) got under way). This was not your normal batter...it's a cross between batter and dough...the doughy part being because of the yeast I presume. It just thickened up so quickly...much quicker than what I anticipated. But when I was done getting everything mixed together...into the pie pan it went.

The next part was to get the Raspberry Sauce ready. I think this was my favorite part because I love the color of Raspberries. They are so bright and vibrant and scream to be eaten...and I would of had they not been frozen. You basically throw all the ingredients you need for the sauce into a sauce pan and let it get to a boil-which happens within a minute. And once bubbling away you continue to keep it at the high heat and stir it until your sauce is thick. That took maybe 2 minutes. Boy, did it look good. So after it was at my desired thickness, I let it hang out that back burner so that it could cool just a little bit.

The only thing left to do was make the cheesecake filling. You want to cream cheese soft so that first thing I did before any of the cooking was I got the cheese out of the fridge so it could soften at room temperature. The cream cheese just plays a bit more nicely if it's at room temp rather than softening it up in the mircowave...I think because it heats unevenly so some of the areas on the cheese is still cold and hard making it a miserable and horrible experience to mix.  So get the cheese out first!  Once all the ingredients were waiting for me in the mixing bowl, I unleashed my electric blender on them. And it didn't take long for a beautiful creamy mixture to be introduced...the sight is just lovely. I don't know how else to put it. It just looks smooth and mouthwatering all at the same time. I had to sneek a taste...you have to add Almond extract (one of my fave flavors) to the cheesecake filling and I was curious to see how dominating it was. Oh my goodness...it tasted like a creamy, cheesy, almondy silkiness. Delicious!


Once you've got your cheesecake beat real good pour it over the batter in the pie plate. Smooth it around so it covers the sides and it's even. Here comes the fun part- pour the raspberry sauce over the cheesecake filling and then take a knife and start creating swirls with the mixtures. When your done and satisfied with your swirls, the colors combination of the filling and sauce really compliment each other...it's just pretty to look at.

Now here is the only weird thing about the baking process. DO NOT PREHEAT THE OVEN AHEAD OF TIME. It says so right in the directions. Place the cheesecake in a cold oven and then set the temp for 350 and bake for 30-35minutes, until cheesecake is set. This confused me slightly. Since it starts out in the cold oven and the oven gradually heats up...wouldn't you add that time to your cooking time??? So that is what I did. I allowed the cheesecake to gradually heat up in the oven till it reached it's 350 and then I set the timer for 25minutes instead. Since I wasn't sure which way to go on this...I thought I would take it out at 25 minutes and see how it's doing. Well when the timer started beeping at me I went and checked it. I poked it with a tooth pick in the middle and the sides and it came out clean though I could see the mixture was still not very firm in the middle. But that is what I expected when it came to the Cheesecake...all of the cheesecakes I've ever made become more firm in the middle once it's been out of the oven for awhile. The edges were a beautiful golden brown and the top looked exactly like the picture. There will be areas on the cheesecake were some of the mixture has risen differently and that is normal. I think it looks beautiful that way. And it smelled soo good too...I had to really focus on other things to save that cheesecake from myself so it could be presented in it's perfection to my hubby.  And my husband was thrilled with it. He commented on how beautiful and how good it looked. We waited till Eden was in bed before digging in. I don't like giving her to much sugar before bed because it wires her and then she cries for a very long time..she can't handle to much sugar at night. The first bite- Wow! It was incredible...but unlike any cheesecake I've made before. The cheesecake filling was firm but pudding like almost...if that makes sense...and the raspberry topping was delicious and the crust was so so yummy and I am not a crust person...I hate them on pies and cheesecakes...but this one was really good. I would next time maybe try cooking it till 30-35 minutes just to see if it made a difference in the way the cheesecake filling cooked...but it was definitely amazing cooked this way. And my husband was a very very happy man!


Raspberry Cheesecake

Batter:
1-1/2 cups all-purpose flour
2 envelopes rapid rise yeast
1/4 cup sugar
1/4 teaspoon salt
1/4 cup butter/margarine, melted
2/3 cup very warm milk (120-130 F)
1 egg

Raspberry Sauce:
1-1/2 cups frozen unsweetened Raspberries
1/2 cup sugar
1 Tablespoon Corn Starch
2 Tablespoons cold water

Cheesecake Filling:
1 pkg ( 8oz) cream cheese, softened
1 egg
1/2 cup sugar
1 Tablespoon corn starch
1/4 teaspoon almond extract
3 Tablespoons, sliced almonds, optional

Mix batter ingredients together in a pre-sprayed 9-1/2 inch deep dish pie plate. Allow mixture to rest while preparing raspberry sauce and cheesecake. Combine Raspberry sauce ingredients in a saucepan and bring to a boil. Boil 1 to 2 minutes, until sauce is thickened. Whip all cheesecake ingredients in a large mixing bowl with electric mixer until smooth.

Top batter with cheesecake mixture, then raspberry sauce. Swirl mixtures together using a knife. Sprinkle almonds over top if desired. 

Bake by placing in a cold oven; set temperature to 350. Bake for 30-35minutes, until cheesecake is set. 

Recipe note: if desired, batter may be mixed in a separate bowl. Proceed as directed above. 

This recipe is linked to:


Wednesday, March 24, 2010

I'm a list freak

Have I ever mentioned that I am a list maker? Well, I am. I am completely obsessed with lists. I make tons of lists and I think it helps me remember stuff (duh), and help me keep track of the things I need or want...normally it's the want part though. The lists I'm currently working on you ask? Well I have several. Here is my list (haha) for the following lists:

1. My life list- things I want to accomplish, do, see, experience...whatever. I keep this one in my nightstand.

2. My song list- Cd's and songs that I someday hope to own or download...you get the idea?

3. My dvd list- I am a huge movie nut. I love them And I like to own them so yes, I have a list of movies I would like to own someday.

4. My Book List- I am always forgetting about books I want to read or buy...so I needed a place for those.

5. My clothing list- Haha, yes, I am big on fashion. And in need of items...so I like to have a list of everything I hope to buy...I've actually got a few things crossed off on that one...

Which brings me to the last list...my kitchen list. I don't know what I was thinking when I registered with Josh before we tied the knot...but neither one of us was thinking clearly. I think we were both so love struck and giddy that we really didn't think a thing through except the getting married part. Which is why...I have a list...some of the items aren't something I would of registered for...because maybe I didn't know what it was, or I didn't think I would use or...okay...yeah...I just wasn't thinking straight...my mind was on Josh...24/7! Don't believe me, ask his family...Josh and I could not get enough of each other...and it's still like that...only we are a bit more bearable to be around in person :) So here is my Kitchen List...it isn't in any particular order...just as I think of them or need them...

1. Cupcake pan with a lid! I can get these at Ross, but I really want one...it would make transporting cupcakes a whole lot easier. But I need a couple...because at some point I want to make Cupcakes for Awana and there are a lot of kids.

2. Cutting Board. It is still at Ikea and Josh told me I had to wait...so this is me waiting...and blogging about it and why I can't quite cross it off the list yet...

3. New Apron. I have a very sweet one that Grace and Eden made for me last year in the cubbies class for Mother's Day and it's great...but I would like a more girly apron...one that ties around the waist...I think they are so cute and feminine.

4. Dish Towels. Well we are still using the sets we got as wedding gifts and the sets I got as birthday gifts from my brother and his wife many many years ago. Let's say...some of them are dying :(

5. Wire Racks :) Yay, me...Josh made it possible for me to cross this one off the list a couple of weeks ago and I love him for it.

6. Utensil Holder. Another one of those wedding gifts that we registered for but we didn't really have a theme that we liked yet. So the one we have is White and shows every speck of dirt and food stain and it goes with nothing in my kitchen.

7. Cookie jar. I have been on the hunt for one of these for years now. Yes, I've looked online and I can't find anything that suits my kitchens mood. I had one that was my mom's. It was a momma bunny and a baby bunny leaning on each other and my mom used to tell me that it was me and her...well it broke during one of our moves...and I have never fully recovered from it. And I still have my snowman cookie jar in the kitchen :(

8. Kitchen Aid Mixer!!!!! This is my guilty pleasure gift and I could never ask someone to buy me one because of how expensive they are. But oh...my life could be so wonderful with one of these...Black or Stainless Steel is my color choice :)

9. Serving Dish. I have one...and I use it more as my cookie platter ( since I don't have a cookie jar) and really that's all I can use it for because it is one giant round plate. There is no dip in the middle. I am on the hunt for one I like.

10. Tart Pan. This is a very recent addition to my list. I want to get good at Tarts and you can use a pie pan...which I have...but it would look so much better if it were an actual tart pan. But the one I want has a removable bottom so you won't mess up the edges and you can slide it onto a serving platter of some sort ( I would use my cake Stand I'm sure. But I priced one out at Williams- Sonoma for $9.00. It's probably the cheapest thing they sell there, hahaha!

Tea Kettle. Ours broke. Er, well It's in the process of breaking down on us. We've had it for 3 years and we bought it at Ikea. But it's starting to leak and I refuse to use it because it's stainless but it looks like its all burnt and singed at the bottom where it leaks and I'm afraid one day it will burst into flames...yes I am dramatic like that. But until I get a new one...No tea for me.

So that is my list, thus far. I only have one thing crossed off :( But with a few trips to Ross and maybe one special trip to Williams-Sonoma...I can cross a few more things off. Btw- I forgot to mention to all of the other lists I do make...there is always the constant grocery list and dinner menu...menu just sounds better than dinner list...Right??? :)

Tuesday, March 23, 2010

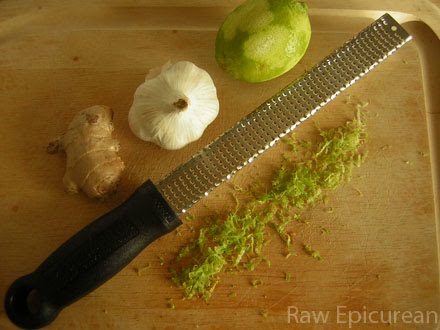
Kitchen Item of the week: The Zester

I feel bad that I didn't do this last week. Josh had a few days off and whenever that happens my time is absorbed in him and my family and everything else takes the back burner. And then since I was so behind on housework and stuff...it just never happened. But...here it is this week.

I probably have the most fun with this than I do with anything else. I just get really excited when a recipe calls for the zest of (insert food here).  It's my Micro-Plane Zester! Even the word Zester...is just fun to say...ZESTER!!! I first came across the zester on where else...but the Rachael Ray show. I saw her using it and I thought...wow- that's cool and I have to have it. And within a few months, I finally picked one up at Bed, Bath, and Beyond. I think it only cost like $13.99. So yeah, it was expensive...but it has paid for itself many times.


You can literally zest anything with it. I use it for grating garlic and fruits like lemons or limes. And like in the picture you could even do ginger root. Onions are incredibly easy to grate and you don't tear up at all. I feel like flavors are really enhanced when you include the zest into your food. Of course my favorite thing to zest is Garlic. I'm obsessed with garlicky foods and I love the way my hands smell after touching garlic that's been squeezed out of it's wrapper. Anyways, this is my kitchen item of the week. It's a small fortune to buy it, but worth every penny!

Monday, March 22, 2010

Homemade French Fries

I think I've mentioned before that I am a potato girl. I love Potatoes...always have. I think I inherited that from my dad (step-dad)...he is the same way. I also love French Fries...but I hate ordering them from fast food places (except BurgerVille) because I know they are not the most healthy thing. The deep fryer is a horrible way to cook things...except that everything always tastes so good after being cooked in a deep fryer. But since I love Fries...I wanted to learn how to make my own.

The whole French fry thing was a graduated process for me. I had to really learn which seasonings I liked with them first, because I wasn't just going to salt them to death. So I tried different seasonings with frozen french fries...Ugh...now that I make fries pretty well now, I hate to admit that I bought that frozen stuff. But I did. But let me just tell you what I do now.

Obviously, you need to wash the potatoes. So do that. I use normal baking potatoes but eventually someday, I would like to make sweet potato fries. It just sounds good to me.  So give the potatoes a good scrub...if your lucky like me...you may have one of those potato scrubby things with the bristles, they are wonderful.   Then I pat them down to wipe off the extra water....I hate cutting slippery wet potatoes...your going to lose a finger that way. As a rule of thumb...( no pun intended) I use a potato per person...and I count little Eden because she loves my fries. but if you feel once you've got your fries all sprawled out on your cookie sheet and it doesn't look like there will be enough...by all means...cut  more. I cut the potatoes in half length wise and then again down the half of one of those sides and I just start cutting them like your cutting french fries. If some of the potatoes are really long or big... shorten them a little bit...( I leave the skin on btw, because I love the flavor) or cut them anyway you want...they are your fries after all, and no one is going to judge you!

Once you have all your fries cut into their fry strips...it's time to season. I generally start with some garlic powder ( I don't measure any of this) I just shake the containers until I'm happy with where the seasonings fall over the fries. Then I add some grill seasoning...I love the smoky flavor of it. And then I continue to do the same with Paprika and Pepper. I leave the salt for last...because I'm not big on the salt. But just scatter enough to your preferred liking. Once all the fries are seasoned...drizzle some EVOO on all over. Once the evoo is on, your going to get your hands dirty. So take off those rings and dig in. Mix with your hands all of the fries around so that all of the seasonings have been coated to all the fries.

Once all this is done...all you need to do is pop them into the oven. I throw mine in on 450 for 20+ minutes. 20 minutes is the least amount of time...but depending on how many fries you have cooked up...they may need to go longer. If you want, you can open the oven at the half way mark and take a spatula and toss the fries around...the fries most likely will stick a little but doing that will prevent it a bit. My homemade fries go perfectly with a Burger and Hotdogs or any other food that fries go nicely with. Just make sure you don't make the mistake that I almost always make. I always forget that potatoes seem to be one of the longest cooking vegetables ever. So start them first. Get that oven pre-heated and throw those fries in the oven as soon as you can. That way...there is no waiting when the rest of the food is done. A fork should be able to poke through the fries with ease...and when that happens your good to go. I hope you enjoy them. They are very very tasty!


Chels homemade Fries

Baking potatoes, cut into French fry strips

Garlic Powder
Pepper
Grill Seasoning
Paprika 
Salt
Evoo

Directions
Preheat oven to 450. Get out a cookie sheet. Wash potatoes and cut potatoes into French fry strips. Once all potatoes are cut, spread them out on cookie sheet and start seasoning with all the spices listed above. Then drizzle evoo on top and mix to coat evenly. Place in oven for 20minutes. If not done, add additional time as needed. 

Wednesday, March 17, 2010

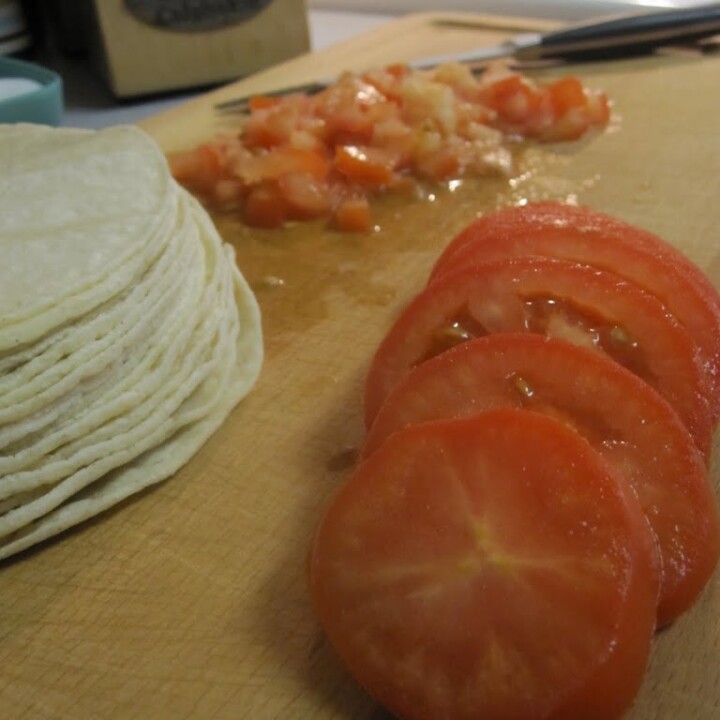
GUEST BLOGGER - Tacos de Pollo Delicioso!

Well, good evening. I, Joshua Rief (AKA Chels's husband), am a humble guest to this particular blog (although you can check out my more typical literary endeavors at jsrief.blogspot.com), and I join you tonight to share my personal culinary specialty: tacos de pollo delicioso (AKA delicious chicken tacos)! No more AKAs, I promise (maybe). 


As Chels has no doubt shared with you, we love to cook together. Occasionally, however, I also cook on my own. When that happens, it inevitably involves a couple of key ingredients (if it's not breakfast, and it usually is) - the barbecue, many cheeses, meat, food of Latin origin, and lots of very hot oil. Either that or food of Tuscan origin. And, again, that's when it's not breakfast. So, really, there's no rhyme or reason to it. Could be hotdogs. Drop the inevitability. The only certainty is that I will burn myself. Everytime. Ah, the sacrifices we make for the things we love. 


So, tonight, I fired up the grill when I walked in the door. Es muy importante to preheat the grill properly. Normally, if I turn it on when I get home, by the time I have changed out of my suit and into sweats and a t-shirt, it's ready to go. Chels was kind enough to marinate two generously-sized chicken breasts in our favorite mesquite lime marinade for an hour before I got home. As soon as I had el pollo on the grill, I prepared the essentials. By this, of course, I mean that I set the mood. Again, es muy importante. Your creation will reflect the mood in which it was created, so pay as much attention to this as your ingredients, temperatures, etc. With Pandora steadily cranking out the Fifties jazz (i.e., Sinatra, Martin, Nat King Cole, and, of course, Mr. Buble), you're well on your way, but it doesn't end with the music. Don't cook in a dirty kitchen - that's crazy-making, and fast. In this case, Chels had the kitchen sparkling before I even got there, but even if she hadn't, cleaning it first is well worth the extra five minutes. Next, Chels poured us both a small glass of Barefoot Sauvingon Blanc (if you're not already aware, Barefoot is a boon to aspiring wine aficionados on a budget), and I got to preparing the ingredients. 


Now, if you think that the ingredient preparation is the beginning of the cooking process, you are gravely mistaken, at least where Mexican food is concerned. No, no, dear reader, we remain in the mood-setting stage. Once there are bowls of beautifully bright red diced tomatoes (I prefer Roma, but that's your call), stunningly crisp and fresh green leaf lettuce, and tantalizing white and orange Monterey Jack and Cheddar cheeses available at your beck and call, then, my friends, you are ready to move on to the cooking. Truly, these bowls of brightly colored ingredients set the mood as much as Sammy Davis and Mack the Knife. Additionally, there is something inherently relaxing about prepared ingredients ready and just waiting to be doled out upon some delectable creation. 


Now that the ingredients are ready to be distributed, the cutting board is re-cleansed in preparation for its impending date with some lightly seared chicken breast. Additionally, it's about now that I place a high-walled frying pan on the stove top and begin to heat about a quarter inch of oil in it. Vegetable oil is definitely best (don't even think about canola oil!), and a medium-low heat setting (4 out of 10) is perfect. While the oil heats (and no doubt prepares itself to injure me grievously), it's time to retrieve the chicken.


El pollo has spent about six minutes on each side out on the barbecue, at a medium-high setting. The use of medium-high, versus traditional medium, sears the outside and eliminates all pink on the inside, while at the same time leaving the tender white meat inside soft and moist. Re-introduced to my best of friends the cutting board, the chicken is quite ready for some tender dicing with a very large and very sharp chef's knife (just the sort of thing that will one day claim my fingers, no doubt). I recommend slicing the chicken into strips initially, and then dicing it across. And, don't kid yourself, there is no possible way you can avoid eating some at this point. It simply isn't going to happen, so save yourself a lot of time and self-loathing and just do it. Unfortunately, this is also the first time that the aroma arrives. Unfortunately, you say? Isn't aroma part of your precious "mood," you say? Had a bit too much of the afore-mentioned Sauvingon Blanc, you say? Au contraire, gentle reader. Because when the aroma arrives, so does everyone else who happens to be residing in your humble abode. The kids you may be able to fend off effectively, but do the same to your spouse at your own peril. Now that half your supply of chicken has mysteriously vanished, we move on.


The oil is hot at this point, so use extreme caution (somehow I never retain that piece of advice). You can't tell, of course, because oil is evil and wicked that way. If you are tempted to dip your fingertips in to test the heat, please do so, but sign this liability release waiver first, many thanks. Now, at this point, the preparation accelerates alarmingly, so before I continue, I always make sure that the family is gathered and ready to eat, the table is set, etc. Additionally, you will require a plate with two paper towels on it. Have another two paper towels ready to place on top of these, as well as a large lid of some kind to cover it all with. More on this later. 

I use six inch white corn tortillas (Costco, $4 for 100 - seriously). After doubling them up, I place them in the oil. If my pan is big enough, I place two (actually four - doubled up, as you may recall) next to each other. After about five seconds of bubbling in the oil, the diced chicken goes in a line down the middle of the tortillas. Another five seconds, and then I fold them over the chicken into a more traditional taco shape (finally!). If you're wondering, I'm not doing this with my fingers - I really was joking about that (although I get burned anyway). Rubber-tipped tongs are perfect (Ikea!). Another five seconds folded over, and you're ready to lift each taco up individually, tip it slightly to let the excess oil run out, and place it on the previously prepared plate topped in paper towels ("Ah-ha!" you say!). Immediately cover the tacos with the remaining paper towels, and cover them with the lid ("It all makes sense now!" you say!). 


You really can't get more than four done before they must be served. Four at the most. Four is pushing it. The key here is serving them hot. If you don't serve them hot and fresh out of the pan, dump them down the garbage disposal or feed them to your dog. Seriously. Well, maybe not the dog, as the oil content might not be great for Fido's digestive system. Same with the garbage disposal, actually. Okay, fine, eat them, but they won't be as good. Point made?


Place the tacos two to a plate, and open them back up. Top generously, in the following order (no messing with this...): cheese (generously, remember), tomatoes (lots and lots - they furnish the moisture here), and lettuce (need I really say it? Generously!). They are delicious if you stop here, but I personally recommend topping the whole thing off with La Victoria Medium Chipoltle Taco Sauce. Chels uses La Victoria's Mild Red Taco Sauce, so each to his (or her) own. At this point, you're ready to eat - but don't forget, you've only made four. Based on past experience, you will remain chained to the stove as your many minions clamor for more. I can't emphasize strongly enough that, much like good waffles or pancakes, they must be eaten fresh out of the pan, even if it results in an evening of indentured servitude. At the end, you will be rewarded with four tacos of your own, so it will all be worth it. Make somebody else do the dishes. 


Well, that's all there is. Obviously, you're welcome to use other meats (we've done steak), but chicken seems to be the best. Add refried beans, Spanish rice, etc for a full meal deal. Excellent with cerveza, water, Mexican Coca-Cola (real sugar cane!), or Kool Aid (haha, just kidding). Enjoy! My family definitely does, down to my adorable and occasionally adventurous five-year-old, Grace. Eden still sticks with a cheese quesadilla. Soon enough, she'll graduate. 

Until we meet again, beunas noches!

Cocoa Chiffon Cake with a Vanilla Glaze


My all time favorite dessert has always been cake. Nothing gets me more excited than a yummy fluffy cake with frosting that melts in your mouth. Which is why, the bakery was always my favorite section of the grocery store. As I would walk through, I would just stare at all the cakes. Wedding Cakes, birthday cakes, holiday cakes...they all looked so fragile and gorgeous, and most of all...they looked yummy.

I've been wanting to push myself a bit more in the dessert area...but baking can easily get expensive, with all of the different tools you need...and it can get confusing...quickly....if you don't understand what a cookbook is trying to tell you. But nevertheless, I wanted to bake something...and I had my eye set out on a homemade cake.  A couple of weeks ago, I bought a bundt pan. I think Bundt Cakes always look elegant...probably because of the rippled mold. So I took out my Hershey's Fabulous Desserts cookbook and started flipping through the pages looking for a cake that I could possibly create. I came across a picture of a Cocoa Chiffon Cake...and after mulling through the directions and ingredients, I decided that I could do this. But I needed Cake Flour. I knew exactly where it was in my grocery store and I knew the box it came in...but I had to sell the need for this particular flour to my hubby...who doesn't always understand the need for particular items...especially when they are $3.46. That's not a lot of money, but it is for flour. But I was able to persuade Josh that I desperately  needed this item and they he would not be sorry he bought it.

Monday night, Josh and I made a yummy steak dinner. The weather was decent enough for grilling and the food was incredible. But I wanted something sweet to finish off the evening. The night before I had convinced Josh that I needed to remodel my farm on the FB game Farmville (it's really a stupid pointless game, but it entertains me). So while he worked on my farm, I got to work on the cake. I successfully separated 7 egg whites from the yolks and made the cake batter...Can I just say YUM! Homemade batter is way more tasty than that stuff out of a box. The I got to work on the egg white bit. I had to mix the egg whites and cream of tarter till stiff white peaks form...??? Um what? What is a stiff white peak? Well I had an idea...I kind of pictured whipped cream peaking...so I decided to use my mixer...but after several minutes of using the mixer, nothing was happening so I  went the old fashioned route and used the hand God gave me...OW! Boy, I have a new appreciation for the Puritanism people who had to do all of their baking and cooking by hand. Finally, everything started to thicken up and I can't say I really ever saw to many stiff peaks...I got too irritated with the waiting process. And when Josh and I thought it was good enough, we folded in the Cake Batter to the Egg whites. I say we, because I started it...but then Josh finished my farm and well...I made Josh finish the folding, Hahaha! He put it in the Bundt Pan and into the oven and got it cooking.


After the Oven beeped we took the cake out...Looked beautiful and it was springy....just like it was supposed to be. So we read we were supposed to "invert the pan on a heatproof funnel until completely cool"....what is a heatproof funnel? No idea...but google was helpful enough with its pictures to inform me that I did not own that particular item and I was out of luck. So we just let it cool in the pan. Sometimes in life, you gotta improvise. After it was cooled...the cake wouldn't come out of the mold, heehee, so Josh took one of my spatula's and we started loosening the edges and shaking the cake...well as you can imagine...that worked...but a few pieces of the cake broke off :( and while I scoffed at Josh for screwing up my cake ( yes...I am a ridiculous woman...but I'm also pmsing...) and blaming him he was able to ignore me and put the pieces back on the cake...and though it was noticeable that something was wrong...it didn't look to bad. I did apologize to him later ;) I quickly made the recipe for the Vanilla Glaze...couldn't be more simple or tasty...and my cake was finished...and it was after Midnight. Needless to say, we were both tired so we didn't eat any till Tuesday Night. But it was sooo good. Josh, who is not a cake person told me that," this is the type of cake I could get into." Which meant, he really liked it. He liked it so much he had two slices. Grace ate all of hers, Eden ate some and I had a slice. It was delicious and a recipe I would make again :)

Cocoa Chiffon Cake
2 cups sugar, divided
1 1/2 cups cake flour
2/3 cup Hershey's Cocoa
2 teaspoons baking powder
1 teaspoon salt
1/2 teaspoon baking soda
1/2 cup veggie oil
7 eggs, separated
3/4 cups cold water
2 teaspoons vanilla extract
1/2 teaspoon cream of Tarter

Heat oven to 325. In a large bowl combine 1 3/4 cups sugar, flour, cocoa, baking powder, salt, and baking soda. Add oil, egg yolks, water, and vanilla; beat until smooth. In a large mixer bowl beat egg whites and cream of tarter until foamy. Gradually add remaining cup 1/4 cup sugar, beating until stiff peaks form. Gradually pour chocolate batter over beaten egg whites, folding with a rubber spatula just until blended.  Bake 1 hr and 20 min. or until top springs back when touched lightly. Invert pan on heatproof funnel until completely cool. Remove cake from pan; invert onto serving plate.  Spread top of the cake with Vanilla Glaze, allowing some to drizzle down the sides.  12-16 servings. 

Vanilla Glaze
 1/3 cup butter or margarine
2 cups confectioners sugar
1 1/2 teaspoons vanilla extract
2-4 tablespoons hot water

In a medium saucepan over low heat melt butter. Remove from heat.  Stir in confectioner's sugar and vanilla. Stir in water, 1 Tablespoon at a time, until smooth and until desired consistency. About 1 1/4 cups glaze.


Linked Up :
My Sweet and Savory
Comfy in the Kitchen

Sweet as Sugar Cookies
Eat at Home's Ingredient Spotlight


Saturday, March 13, 2010

Good friends, Good Food, and 8+ years of history!

I think it's important to make time for your friends. It's not something I've always been good at and I'm not saying I'm good at it now...but I'm getting better. It's just so easy for me, to make my friends the last priority in my life because my time with my Husband is so special. But my friends are special too and I want to make them feel like that too :)

Last night, I had a very rare opportunity to go out to dinner with two of my very dear dear friends! Donella and I have been hanging out a lot lately and I've been having so much fun. She is such a easy friend. She is understanding of my life and doesn't make me feel guilty for the decisions I make regarding my time. We're the kind of friends who can easily pick up our friendship after not seeing each other for awhile...I think that is a rare quality in someone. Our friend Sandra is the same way. Sandra has been living in New Mexico for awhile now and we don't get to see her often. But last night we made time for each other and went to Macaroni Grill.

Now I know the blog is about me and my hubby cooking, but eating out I think is important too. For me, it's a treat because we really don't do it that often. I've been to the Macaroni Grill only a few times and I've always liked what I've got. But since I'm more into counting calories now than I have been in the past...I like to know what I am going to get ahead of time. It makes the temptations that much easier for me and I can weigh what I'm willing to give up and what I'm not willing...and it makes it a lot easier if I don't have any cravings at all. The Macaroni Grill does not list their nutritional menu on their website at all....which makes me mad...but to my surprise they do include it in their menu. But to my frustration, Sandra and Donella swiped that part of the menu away from me and I had to go by what I knew was healthy and such...which meant I really had to read each item on the menu and pro and con them. I knew that I wanted Chicken...but I wasn't sure if I wanted pasta. I finally narrowed my choices between the Pollo Limone Rustica and the Grilled Chicken Spiedini.  The Rustica had a parmesean cream sauce and penne pasta with chicken and lemon zest. The grilled chicken was just that...chicken that was grilled on skewers with rosemary and roasted veggies. I went with the Grilled Chicken...it honestly just sounded better to me.  Score- I found out later that it was 320 calories!!!


We laughed and talked and had such a good time. It was like we were back in high school again. Kind of a nice feeling, to know that we haven't all changed so much in our personalities; That were still goofy girls. We decided to get dessert...the Lemon Passion Cake...which is over 1000 calories...but since we split it 3 ways, I didn't feel guilty at all about eating it...and it was soooo good! 


We spent the rest of our time wandering around Bridgeport...going into Urban Outfitters and Borders.  And we met up with the guys (Josh and Derek) later because they had the kids. It was such a wonderful night and I am so glad we had some time together....now if only Susan had been there...it may of been complete :)

Thursday, March 11, 2010

Morning Madness


I have a confession...I'm somewhat of a pampered woman...well...maybe to be a bit more honest...I am quite spoiled by my husband. It's true...I am. But I think even before I married Josh, I was pampered in one way or another. My mom spoiled me a bit too. Just a bit though ;) But here is another confession...the coffeemaker...stumps me! Yes, there it is...I am constantly being outsmarted by our stupid and expensive coffeemaker.

I have to have coffee every morning...but it's on my terms of when I am ready for it. And Josh has always been the one to make it for me. If not him, then it's Starbucks or Peets Coffee or back in the day, my mom. I knew that you had to put water in the thing...and press buttons but since I'm being honest...I've always been to lazy to really learn. Okay, there I said it...I'm lazy! *phew* I feel so much better getting that off of my chest, haha. When I was pregnant with Eden...especially the first few months, I was tired...so Josh bought me one of those cup warmers that just plugs into the wall. And every morning before he left for work...he would make my coffee the way I liked it and leave it on my cup warmer so it would be right there when I woke up-he is so sweet isn't he? After months of using it, it kind of gave out and the warmer thing wasn't making my coffee warm. So I had to start zapping it. And it's been this way up until the last few months.

Although I love coffee dearly...I also love to drink sweet coffee and I cannot drink Josh's bold strong flavors. It's just not what I grew up on and it's to strong for me...meaning I have to put several teaspoons of Sugar in the coffee to sugar it up enough. So, Josh has been buying me my own special flavored coffee. I get to pick the flavors and it's so fun. And I don't even mind the crazy looks I get from people as they pass me in the coffee aisle and they see me with my nose in grinder sniffing the different scents, it is kind of funny if you see me do it.  Anyways, every morning, Josh will make his coffee and then proceed to clean the coffee maker out again just so he can make me my special coffee. I had been using Beans...up until this week. We had to buy the pre ground stuff because it was on sale and when I woke up early in the morning, I wandered into the kitchen to press the on button on the coffee maker and there was a weird sound I was not using to hearing. And I couldn't understand why it wasn't working. So I called up Josh in a panic and ( I didn't yell) I frantically demanded why I didn't have coffee in the coffeemaker. Josh of course started laughing at me which made me more frustrated and he explained about the different lights and buttons on the coffee maker and that I needed to press the on button once...when I told him I did that and it made a weird noise he explained that I must of hit it twice in my frustration. So I hit the button once and nothing happened...no noise no nothing. Again he laughed, and said, "give it a moment." So I did...and low and behold if I had been more patient I would of seen that coffee really was brewing.  The next morning...I forgot what to do...hahaha, yes I know, I get confused easily I'm really a blonde on the inside. So I had to call him again and he said the on button...press it....oh yeah, I remember now, Heehee.  So yesterday morning...I knew that I had it all figured out now and there was no way I was going to call Josh and bug him. I simply press the on button and wait patiently (not my strong suit).  The coffeemaker started making it's coffee making noises and when it beeped (informing me it was ready) I walked into the kitchen, oh so proudly. I take the carafe out of the coffeemaker...and it's Hot Water only!? I start to panic for a moment....I did everything right. I pushed the button and waited patiently. Josh must of screwed up, finally! Hahaha, yes I was rejoicing slightly that it wasn't me that did something incorrect. So I called him up and I said...so I made my coffee this morning and imagine my surprise when I went to pour it and there was only hot water in the carafe....and he started laughing again and he said," Your Right! I did everything else this morning except put the grounds in the coffeemaker." So after explaining to me what to do and where to fill the water up and where to put the beans...I had coffee brewing 10 minutes later.

It's a funny story...it just goes to show what an idiot I am most of the time and what I do to constantly embarrass myself even when no one is even around me.

Wednesday, March 10, 2010

It melts in your mouth...Pot Roast with Gravy

I love my crockpot...I love it so much that I have 3 different kinds of crockpots. I have my very first one which was a wedding gift. It's a nice 3-4 qt one. But I used it so much that it died...well it still works, but the knob has broken off...(note to self...have my dad glue my knob back on).  So I don't really use it. Then year before last, my hubby bought me a huge digital crockpot...it holds everything and it's mother. It's wonderful and I love it and it's so good that it even made Rachael Ray's list of one of the best crockpots :) The other one, I have yet to use...but it's a baby crockpot. You just plug it in, and it's on. I plan on using that one for fondue like sauces or warm drinks.  The point is, I can't live without my crockpot and I use it on a weekly basis.

The huge one, Josh bought is perfect because now, I can fit all sorts of meats in it. I can fit a whole chicken, chicken breasts, and roasts. Which is what I did last night. I made a yummy Roast. I've tried many different methods of cooking roasts out...though, I have yet to try the coke recipe...it sounds weird to me. But after experimenting with different seasoning and such...I was never completely pleased with the outcome. It was either perfectly moist or really over done. The recipe I have been currently been using comes from the Kraft Foods website.  I use a lot of their recipes and almost always, they are really good and interesting meals. What I like about this one is the meat is always perfect and the flavor is comforting. It really does taste like I've been in the kitchen all day long.

Yesterday was a good day for this dish. The weather has been cold and crazy and Josh has been really tired from work lately and I've have the roast in my freezer for about a month. Seemed like the perfect time to make it. Josh walked through the door and said, dinner smells amazing. We got all of our plates served and sat down at the table and Josh took one bite and gave out a quiet groan and said...,"Chels, this is perfect...the meat just melts in your mouth :)" Grace followed that up by declaring how good it was as well and Eden's face was covered in food. She had two helpings. The recipe says it makes 8 servings, but I cut the carrots and potatoes down to what would feed all of us. And I left out the onion...Josh and I aren't onion lovers at all...though I have more of an open door policy to them than he does ;) Anyways, there was no leftovers...except for a small helping of potatoes and carrots. Everyone cleared their plates and Grace and Josh had Pumpkin Pie for dessert...store bought :) If you try this out...I doubt you'll go back to any other recipe...it's that good!


Pot Roast with Gravy

1 boneless beef pot roast ( 2-1/2 lb)
3/4 lb small red potatoes ( about 8) quartered
8 carrots, peeled, quartered
1 large onion, thickly sliced
1 bottle ( 18oz) Kraft original BBQ Sauce
3 TB flour
1/3 cup water

Place meat in slow cooker, top with vegetables and BBQ sauce. Cover with lid. Cook on low 8-9 hours or on high 6-7 hours. 

Remove meat from slow cooker, cover with foil. Let stand 10 minutes. Meanwhile, remove vegetables with slotted spoon to serving platter; cover with foil. 

Mix flour and water; stir into liquid in slow cooker until thickened. Slice meat; add to platter with vegetables. Top with gravy.

Tuesday, March 9, 2010

Kitchen Item of the week: The Veggie Peeler

It always plays out the same way...I walk to the kitchen drawer that holds 97% of all my utensils and my hands quickly find it...not because it's easily accessible, but because of it's very noticeable color. I am talking about my Pink Kitchen Aid Vegetable Peeler. Yes, I have a pink kitchen item!!! Not only is it a Kitchen Aid...a brand which I love and adore...but mostly because it s my favorite color.

I only acquired my veggie peeler maybe a year and a half ago...another little gift from my mommy...this one I believe was my Easter gift, LOL- yes occasionally I will get Easter Loot...I firmly believe your never to old for the Easter Bunny...or rather any excuse to receive a gift, hahaha!

As much as I do love my peeler...I will only use it on carrots. I've been told they work on potatoes...but for whatever reason I am as uncoordinated as they come and I can not master the skill it takes to peel a potato...so I prefer to use a good old knife for my potatoes...yet another skill I am working on. I've watched my mom many a times peel potatoes with knife and I always will continue to stare at her ease and capability when it comes to sliding the knife down a potato or any other think that needs to be knifed. The woman has skill and boy is she fast. I remember watching her slice bananas for a fruit salad when I was little I recall telling her to slow down because I was afraid she was going to slice a finger off. Obviously, she knew what she was doing because all of her fingers are still delicately intact. Thank Goodness!

But my Peeler...Oh I do love, slices the skin off my carrots so quickly and so perfectly and before I know it, I have a gorgeous orange, slightly crooked carrot in my hand. It probably is a tool, you can live without...but now that I have one...I can't remember what I did before, LOL! And that's the item of the week :)

Friday, March 5, 2010

Cheese Enchiladas


There are two kind of Enchiladas in my book. There are my mom's amazing Cheese Enchiladas and their are my husband's mouth watering Chicken Enchiladas. Both are incredible and both are extremely different.  Mom's is easier, less involved and has a yummy red sauce and Josh's are time intensive, more challenging and have a creamy white sauce. I don't think I will ever attempt to make Josh's enchiladas...I mean I live with him, if I want them, I will have him make them. But since I no longer live with my mom...I needed to learn how to make hers.


I've grown up on my mom's food, and my taste buds associate different memories with each of her meals. This meal was one of my favorites and it was a necessity that I learned how to make this for my family.  It's such a basic recipe I'm sure I could of figured it out for myself, but there is just something about asking my mom for cooking advice that makes me happy.


Like many of the meals I plan on out on the weekly menu, some of them eventually get pushed aside because life is busy. I have been telling Josh for three weeks now, that I was going to make this meal and finally tonight seemed to be as good of night as any. Originally, Josh was supposed to come home and we were going to relax and create the meal together, but Josh got out of the bank late which meant he got home late. So dinner was going to be late. I decided to go ahead with the cooking and if he had time to join me, he could.  By the time he walked in the door I was already half way done warming the tortillas and wrapping them up in their cheesy goodness. By the time Josh was done changing, etc...dinner was basically done. I was just waiting for the enchiladas to finish up in the oven.

 I'm always a little hesitant about the outcome of a meal that I am copying ( i.e. mom's recipes), I want it to turn out right and I have such high expectations that if it turns out less than what I expect, I get really upset. Thankfully, the oven timer went off and I went to remove them from the oven and low and behold....they looked exactly like my mommy's!!! It was up to the taste test then.

After Josh and I had served all the plates up and sat down at the table...I took one bite of my exact replica cheese enchilada and it was amazing...and it tasted just like mom's! Boy was I happy!!!


Cheese Enchiladas
Source: My Mom's Recipe

1 can red enchilada sauce (15-20 oz can)
4 - 1/2 Cups Shredded Cheese ( Mexican Blend or Sharp Cheddar)
2/3 Cup Vegetable Oil
10-15 Flour Tortillas 

Pre-heat oven to 350. Take a frying pan and fill it with veggie oil and get the oil really warm, between low-medium heat. Spread some of the red sauce and spread it around a 9x13 baking dish...enough to cover. Keep a plate with a couple paper towels on it by the stove. Place tortillas in oil for a few seconds on each side...enough to wet and dry off on plate. Layer cheese in the middle of tortillas and roll like a sleeping bag making sure to tuck in the sides as you roll. Once your baking dish is full, pour more sauce over the Enchiladas...a thin layer. Sprinkle remaining cheese on top. Bake for 20-25 minutes. For added flavor you can add diced up onions or sliced olives on top.

Just a note: These Enchiladas are taste incredible as leftovers too :)

The kitchen treasure I found at Ross

I love scoring a deal and finding a find! I love the adrenaline rush I get when I spot something I've been wanting and I see that it's on sale. I get so excited that I often do a little happy dance...and then I quickly realize that I'm in public...and I automatically stop the dance, stand up straight and act like nothing happened. And that is just what happened yesterday.

I've been meaning to go to Ross for the past few weeks. But I never had the chance till yesterday. I had to run out to DEQ and after my car failed :( I needed a little pick me up. So I decided to drive my little Eden and I, to Ross for some kitchen shopping. A quick note about my cute little car...it's not a serious issue why the car failed...we thought it might because the check engine light has been on, but Josh bought the part last night and if it's the right size, we'll be fixing the problem Saturday. I called my mom on the way to the store and she said she was at Ross but couldn't talk. So since I was already headed there I decided to see if I could bump into her.

Eden and I got there, and see my parents car, and I headed to the back of the store and there they were....discussing which giant mirror they should buy for their new office makeover. I told mom I was there because I was looking for a meat pounder ( which is true) and we ended up going through all the kitchen stuff together. We walked down the first aisle and I found my Bundt Pan I've been wanting badly. It's been on a list of things I've been wanting to buy for a good 8 mths now. It's a nice big Farberware Bundt pan. So cute. I needed a new cookie sheet as well, but as I was turning around to put the pan in the shopping cart, my eyes fell to the bottom shelf of the rack...and there it was...a blue Rachael Ray 11' enamel cast iron grill pan!!! For those who don't know me to well, I have an obsession with all things Rachael Ray. I adore her and a few years ago Josh bought me a beautiful pots and pan set for one of our anniversary's and since then I've been buying Rachael Ray products off an on. Her stuff is well made and I don't have one complaint about it. Anyways, there were two boxes with the same item- one was already opened so I decided pull the pan out of the box and inspect it, gosh it was heavy-makes sense since it's cast iron. It was a nice shape and solid and then I looked at the price---Clearance!!! The tag, literally took my breath away....at closer inspection I noted that it retailed originally for $60.00 and it was marked down to $22.99!!! I quickly showed my mom, the excitement showing all over my face and my mom just shook her head and laughed at me. Probably because I was acting like a fool. I decided to grab the box that hadn't been opened yet and put in the cart completely thrilled.

We then found our way to the Kitchen utensil aisle. I found my Meat Pounder- a Kitchen Aid meat pounder mind you, and it's beautiful, sturdy, and I have no doubt that it will pound the heck out of my chicken.  I swear, Ross is the place to go if you want good brand name kitchen items but don't feel like paying a real price tag. They had some Paula Deen knives there and a few Emeril pots and more Rachael Ray pots, but I had those one already so no need for the drooling there. I could of  stayed in that section for hours...but looking to my right and noticing all the racks full of clothes...well I couldn't help myself...I had to look. My mom found me a cute grey shrug like sweater with cute details that after trying on quickly in the dressing realized I couldn't leave without it. I also found a cute little red rug for the front of our entryway when you step into the apartment.

 As always, I had to go through all of the things I threw in my cart and realized that I could live without the Farber ware cookie sheet for now...and set it aside.  My dad bought all the things my mom wanted and we said our goodbyes and I checked out with all my loot! Walking to the car with Eden on my hip and my purse around my shoulder and my arms trying to carry the huge bag of goodies, I could help to feel that adrenaline rush again. I got some things I needed as well as my unexpected finds and I was sooo stinking happy!!!!

Wednesday, March 3, 2010

Kitchen Item of the week: The Steamer Insert
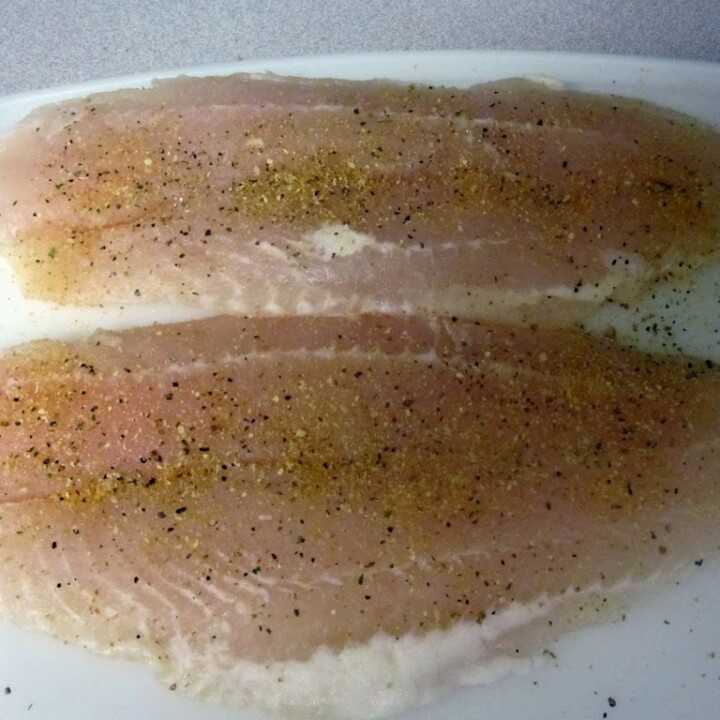
My mom and I have a lot of discussions about cooking. I go to her for pretty much everything because she is without a doubt the most fantastic cook I've ever met. We trade recipes-correction, I drain her of all her recipes as she put it recently. We talk about kitchen gadgets and different ways to cook things...and she always has a list of helpful suggestions. I look forward to these talks.

A couple of years ago, we were having this conversation about kitchen gadgets and we started talking about Steamer Inserts. I didn't have one, so I was asking some questions and I must of said something like," Hmm, I need to get me one of those at some time." Well she was listening because that year for Christmas, I got a Steamer Insert in my stocking. As thrilled as I was...I was also filled with fear. How the heck did I use it? For whatever reason, this metal gadget scared me.

Finally, a couple months ago, I decided to just get over my stupidity and try the thing out. I had dinner over at my parents house and my mom made these amazing red potatoes with garlic powder and butter and I asked her how she cooked it and she said, she steamed them...so that was the catalyst that made me confront my fear. I decided to try it out with broccoli...I've always boiled my broccoli before and I've always hated doing it that way because it takes some time and it's easy to let them cook to long...which completely defeats the purpose of eating broccoli. It's a healthy veggie and if you cook it to long, it's mushy and not that beautiful vibrant color of green that I so love. So I tried it out, I put a little bit of water in the pot, put the steamer inside it, plunked the cut up broccoli inside, seasoned it, and then put the lid on. Within maybe 5 minutes, I had perfectly cooked broccoli! I was sooo excited that I got over that stupid little fear of an unknown utensil that I now use at least once a week.

I firmly believe that it is one of the best inventions that you can have at your disposal in the kitchen. What could be better than something that expands to fit pots and helps veggies not only keep their beautiful color, but their rich flavor as well.

There will be no cooking blog tonight or tomorrow morning as I will not be cooking dinner tonight: I'm having dinner at my in-laws as kind of a farewell to one of our friends who is moving across the country to be with his soon to be wife.
Blogging tips